 Graphtec CE5000 Cutter
October 22, 2008
The Graphtec CE5000 is a cut only device, and is only available if the special registration code, "CUTTING", is enabled.
Initial Software and Cutter Setup
- SoftRIP Registration Mark Setup: Wasatch SoftRIP can print five types of marks for use with this cutter. These marks are selected from the "Cutting Mark" button inside the 'Setup - Print Unit' window. Select the "Graphtec Type 1", "Graphtec Type 2" marks or the "Graphtec 1/2 Inch Interval Cut Marks" if you intend to use the "RIP Detect" registration method (see the "RIP Detect Registration" section below). After selecting either "Graphtec Type 1" or "Graphtec Type 2" marks, a separate window will be launched to allow you to choose the size of the cutting marks. Refer to the Graphtec Cutting Marks help for more information on this.
Note: When printing any of these marks, you should print with 1" or greater left and right margins, and 2" or greater top and bottom margins. This ensures that cutter has enough room to properly detect the registration marks.
- Connection: Choose the physical connection from the 'Setup - Print Unit' window.
- USB: When you first plug the cutter into a USB port you will be prompted for a USB driver. Install the Graphtec driver provided with the printer. Once complete, the Graphtec will show up in the physical connection list on the print->setup screen.
- COM: Choose the COM port to which the serial cable is connected.
- LPT: Wasatch SoftRIP does not support the parallel interface for this device.
Note: There are two methods to have the cutter detect registration marks. Go to the properties page (Print->Setup->Edit->Properties) to set up which mode to use.
- The first lets the registration come from the RIP.
- The second method is a manual method.
-
Device-Specific Instructions for Print now, Cut Later (RIP Detect Registration)
Note: The print should have been printed with "Graphtec Type 1", "Graphtec Type 2" or the "Graphtec 1/2" Interval" Register marks. These marks can be selected from the "Cutting Mark" menu on the Print/Setup screen prior to printing.
Loading the media:
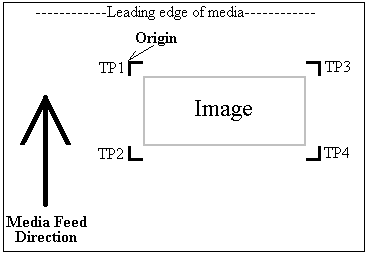
- As the print comes off the printer, note the edge that is to the lower right corner of the print. That corner will be referred to hereafter as the origin (TP1) of the print (see illustration above).
- Insert the media in the same direction as the media originally came out of the printer. Since the cutter cannot cut any media beyond the pinch roller nearest the control panel or the pinch roller furthest from the control panel, align the media so that the pinch rollers are outside of the cutting area.
- After setting the pinch roller,
Press the up or down arrow keys to select "Sheet" or "Roll" paper type.
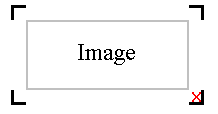
- Sheet: Align the knife in the open area bounded by the first mark (TP1) as shown to the right. Press Origin.
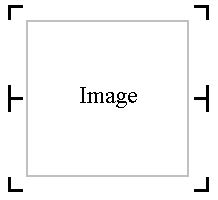
- Roll: Align the knife right outside of the mark corner (towards the lower right). Press Origin
- In SoftRIP, go into properties (Print->Setup->Edit->Properties) and choose "RIP Detect"
- The cutter is now ready for the cut path to be sent from the Cutting Queue. See the user manual for further assistance.
Important Note: If you need to cancel your job due to the cutter being unable to detect a registration mark, you MUST completely cancel the print spooler on the PC prior to cancelling the job on the cutter's front panel. If you do not cancel in this order, the cutter may begin cutting in the incorrect location, damaging your print.
-
Device-Specific Instructions for Print now, Cut Later (Manual Registration)
Important Note: This registration method may result in less accurate contour cuts than the RIP Detect registration method.
Note: The print should have been printed with 1/4" or 1/2" Register marks (Not The Graphtec Marks) and 1/2" marks are preferred. Select these marks from the "Cutting Mark" menu on the Print/Configuration screen.
Loading the media:
- As the print comes off the printer, note the edge that is to the lower right corner of the print. That corner will be referred to hereafter as the origin (TP1) of the print (see illustration above).
- Insert the media in the same direction as the media originally came out of the printer.
Note: Since the cutter cannot cut any media beyond the pinch roller nearest the control panel or the pinch roller furthest from the control panel, align the media so that the pinch rollers are outside of the cutting area.
- After setting the pinch roller, press the up or down arrow keys to select "Sheet" or "Roll" paper type.
- Align the knife with mark #1. Press Origin.
- In SoftRIP, go into properties (Print->Setup->Edit->Properties)
and choose "Manual Detect"
- The cutter is now ready for the cut path to be sent from the Cutting Queue.
- When the path is sent, an information screen will ask you to align point #1
- Use arrow keys to make sure knife is centered on the mark and press "Enter"
- Knife will move to next point(#2). Use arrow keys to fine adjust and press "Enter"
- Knife will move to the final point(#3). Use arrow keys to fine adjust and press "Enter"
- Cutting will now proceed.
-
Device-Specific Instructions for Cut Only
Loading the media:
- Insert the media in the cutter and align the media so that the pinch rollers are outside of the cutting area.
- After setting the pinch roller, press the up or down arrow keys to select "Sheet" or "Roll" paper type.
- Use arrow keys to place the knife over the desired starting point (TP1).
- Press "Origin"
- In SoftRIP, go into properties (Print->Setup->Edit->Properties) and choose "Manual Detect"
- The cutter is now ready for the cut path to be sent from the Cutting Queue.
Interval Between Cut Marks
If you select "Graphtec 1/2 Inch Interval Cut Marks" from the "Cutting Mark" menu in Wasatch SoftRIP, registration marks will be printed at regular intervals down the edges of any print layout. (This feature only works with layouts and with the print spooler, NOT with immediate print.)
When you make this selection, you'll be presented with the following control.
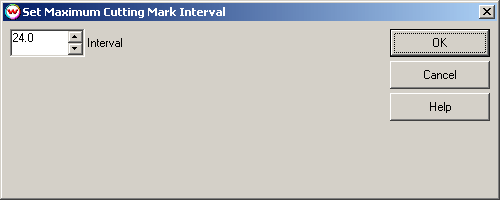
If the length of the print equals or is greater than the Maximum Cutting Mark Interval then interval marks will be created at a regular subdivision spacing. This means that the interval marks would be half of the print length, as would happen if you set a 24 inch interval and were printing 24.1 inches, as shown above.
For example when printing an image:
- that is 24" long with the maximum cutting mark interval set at 24" will place two marks on each edge at a 24" interval (corners)
- that is 25" long with the maximum cutting mark interval set at 24" will place three marks on each edge at a 12-1/2" interval (corners + 1)
- that is 25" long with the maximum cutting mark interval set at 12" will place four marks on each edge at an 8-1/3" interval (corners + 2)
Basic Setup of the Graphtec CE5000
The following instructions explain how to properly set your plotter up for use with Wasatch SoftRIP.
- Set Mark Type
- Press PAUSE to enter menu mode.
- Use PREV or NEXT keys until AUTO REG MARK is selected.
- Press ENTER for the AUTO REG MARK submenu.
- Use PREV or NEXT keys until MARK TYPE is selected.
- Press ENTER to display the current registration pattern setting.
- Use the up and down arrow keys to select either 1 or 2 then press ENTER
to confirm
- Press PAUSE to cancel menu mode.
- Set Mark Size
- Press PAUSE to enter menu mode.
- Use PREV or NEXT keys until AUTO REG MARK is selected.
- Press ENTER for the AUTO REG MARK submenu.
- Use PREV or NEXT keys until MARK SIZE is selected.
- Use Position UP or DOWN to select the size of register marks being used.
- Press ENTER to confirm
- Press PAUSE to cancel menu mode.
- Set Registration Mark Mode
- Press PAUSE to enter menu mode.
- Use PREV or NEXT keys until AUTO REG MARK is selected.
- Press ENTER for the AUTO REG MARK submenu.
- Use PREV or NEXT keys until MARK MODE is selected.
- Press ENTER to display the current mark mode setting.
- Use the up and down arrow keys to select OFF, 2 POINT, 3 POINT, or 4
POINT then press ENTER to confirm
- Press PAUSE to cancel menu mode.