Setting up Print and Cut Workflows
With self-contained print-and-cut devices, processing is handled entirely by the device. Such print/cut devices are sold by Mimaki, Roland, and other manufacturers. After the image is printed, the media is automatically rolled back and cut out. There is nothing else to do.
Setting up a print and cut workflow with separate printers and cutters involves a bit more work.
To set up a Wasatch print and cut workflow, you will configure one of your available print units with a printer, and configure another as a cutter. In a basic subscription with two print queues, we typically set up the printer as unit one, and the cutter as unit two.
Follow this by launching the setup window for unit one, and assigning your cutter as the "Cutting Unit", in the "Cutting Options".
Here is a basic example, with a popular roll-fed DTF printer, and well-matched cutter.
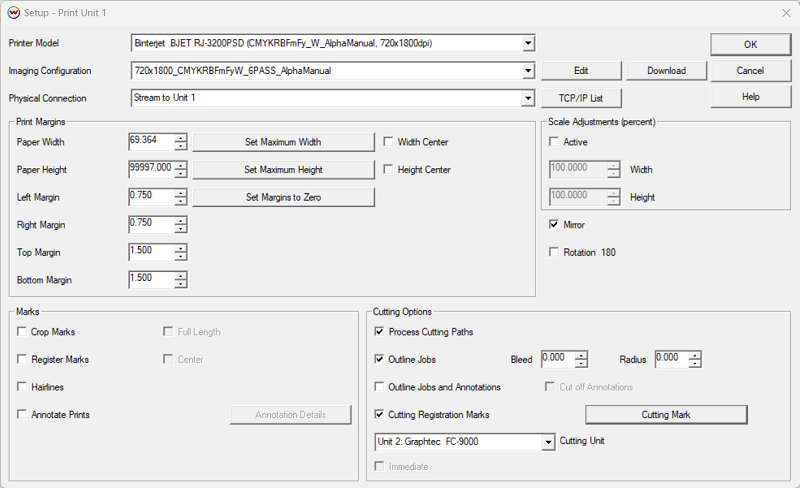 After this setup, any cut paths generated during printing with unit one will be automatically sent to unit two for cutting. What happens after that depends on the details of your particular cutting system, and considerable automation can be achieved.
Controls on this window can be used to set up generation of cut paths during printing. The very simplest is "Outline jobs", which cuts out your rectangular pages.
For contour cutting, select "Process Cutting Paths". This will cut paths specified by reserved colors in arriving files. This is discussed at some length under "Cutting with Corel Draw", and "Cutting with Adobe Illustrator", in the main cutting document linked below.
An additional way to generate contour cut paths is the Tracer, included in every subscription. See this in the main documentation for Wasatch SoftRIP.
"Outline jobs and annotations" cuts out rectangular pages along with any Wasatch annotations, and places a cut between the artwork and the annotation. It facilitates the use of Wasatch annotations as routing tickets in high-volume production.
See a quick video demo here: Production Workflow
Most cutters require the printing of registration marks. Select "Cutting Registration Marks", and press the "Cutting Mark" button for a wide selection of options. Consult the specific documentation for your cutter to determine appropriate choices:
Cutting with Wasatch SoftRIP
For more on setting up Print and Cut Workflows for DTF, see here:
Setting up Print and Cut Workflowsfor DTF Printing
After this setup, any cut paths generated during printing with unit one will be automatically sent to unit two for cutting. What happens after that depends on the details of your particular cutting system, and considerable automation can be achieved.
Controls on this window can be used to set up generation of cut paths during printing. The very simplest is "Outline jobs", which cuts out your rectangular pages.
For contour cutting, select "Process Cutting Paths". This will cut paths specified by reserved colors in arriving files. This is discussed at some length under "Cutting with Corel Draw", and "Cutting with Adobe Illustrator", in the main cutting document linked below.
An additional way to generate contour cut paths is the Tracer, included in every subscription. See this in the main documentation for Wasatch SoftRIP.
"Outline jobs and annotations" cuts out rectangular pages along with any Wasatch annotations, and places a cut between the artwork and the annotation. It facilitates the use of Wasatch annotations as routing tickets in high-volume production.
See a quick video demo here: Production Workflow
Most cutters require the printing of registration marks. Select "Cutting Registration Marks", and press the "Cutting Mark" button for a wide selection of options. Consult the specific documentation for your cutter to determine appropriate choices:
Cutting with Wasatch SoftRIP
For more on setting up Print and Cut Workflows for DTF, see here:
Setting up Print and Cut Workflowsfor DTF Printing
|