 Afinia L901
May 6, 2020
Important Notes:
- For complex, very large files, or long runs that use expensive media, best practice is to make test runs on low-cost media first to ensure that the job runs to completion. Some jobs might require adjustment to compression in order to avoid failures during printing.
- USB support was added in the April 2019 release of SoftRIP 7.8.
Wasatch recommends using the Fast Layout feature with Afinia L901 printers.
For additional details regarding the Fast Layout feature please see the Fast Layout help pages.
The following firmware revisions are currently supported with Wasatch SoftRIP:
Print Mode Options:
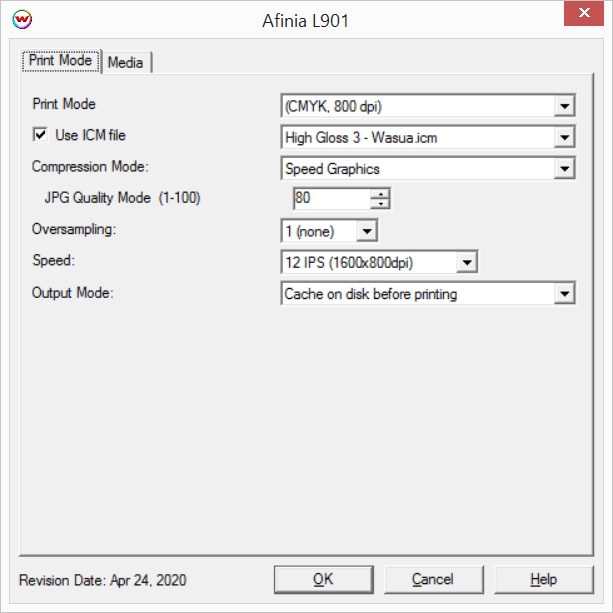
To launch the printer properties for this driver, choose 'Setup' from the 'Print' menu, then click on the 'Edit' button, and then click on 'Properties'.

- Print Mode: Select the resolution that SoftRIP will rip the data at.
- Use ICM file: Specify ICM file to be used for dither control. Leave this control unchecked unless specifically instructed otherwise by Wasatch Computer.
- Compression Mode: Set compression mode (there will be only one choice on normal installations).
- Speed Graphics: Image data will be compressed based on the JPG Quality Mode setting.
- JPG Quality Mode: Set the quality mode (1-100). Setting a value above 80 may cause printing issues.
- Oversampling: Set the oversampling value (1-4). Higher values make the RIP slower while improving image quality in some cases. This should normally be set to '1'.
- Speed: Set the print speed and print resolution (12 IPS 1600x800dpi or 6 IPS 1600x1600dpi).
- Output Mode: Set the method of spooling data.
- Cache on disk before printing: All print data will be written to the hard drive before spooling to the physical connection. This is the most reliable mode of operation, but does introduce a delay to the start of printing.
- Stream to physical connection: Data will be spooled to the physical connection as it is generated. Prints will begin quicker than 'Cache on disk before printing', although issues can be encountered if print data is difficult to compress. If print jobs fail with this Output Mode selected, change the setting to the default of 'Cache on disk before printing'.
Media:
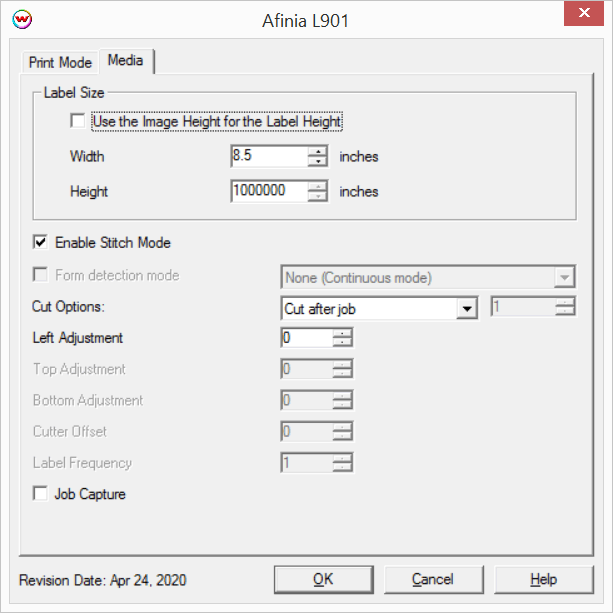
When you click on Media, the following properties page will be displayed:

- Label Size:: Set the size of the labels to be printed.
- Use the Image Height for the Label Height: Check box to automatically set the label height to the height of the image being printed.
- Width/Height: Enter Width and Height of the physical label.
- Form detection mode: Set the detection type for converted or pre cut media. For continuous printing do not enable the control. NOTE: Form detection on the printers front panel must match the SoftRIP setting selected here.
- Label Edge: Uses a transmissive sensor to find the edge of the pre cut labels.
- Pre-printed marks: Uses a reflective sensor to find marks printed on the reverse side of the label roll.
NOTE: When using the standard edition of SoftRIP with either 'Label Edge' or 'Pre-printed marks' selected, the vertical layout gap on the Unit Options tab should be set to zero.
- Enable Stitch Mode: Prints the entire image as a single page. Option only available when continuous printing has been selected.
- Cut Options: Select cutting options.
- Off: Send no cutting commands.
- Cut After: After the printing is complete the media will be cut.
- Sheets per cut: Set the number of pages to be printed before the media is cut.
- Left Adjustment: Adjust the left edge of the image. Acceptable values are -3mm (left) to 16mm (right).
- Top Adjustment: Adjusts the top edge of the image to line up with edge of labels or perform full bleeds. Acceptable values are -16mm (up) to 16mm (down).
- Bottom Adjustment: Adjusts the bottom edge of the image to allow for full bleeds. Acceptable values are -16mm (up) to 16mm (down).
- Cutter Offset: Adjusts the cut line position after making image positioning adjustments to Top and Bottom. Acceptable values are -16mm (up) to 16mm (down).
- Label Frequency: Allows Printer to ignore a set number of gaps between labels.
- Job Capture: When selected, the printer stores the print job in the Printer Job Library after the job is printed. Use the Reprint button on the printer's front panel to access the Job Library
[ Wasatch Home ]
 Afinia L901
 Afinia L901
