 Epson Stylus Pro 4800/7800/9800
January 5, 2006
This Epson Stylus Pro document covers the following printers:
- Epson Stylus Pro 4800
- Epson Stylus Pro 7800
- Epson Stylus Pro 9800
Important Note: Use of these printer drivers requires that your Epson printer is equipped with the appropriate firmware revision below (or later), which can be obtained from Epson:
- Epson Stylus Pro 4800: A0045A - Released 12/01/05
- Epson Stylus Pro 7800: SN0185A_q - Released 10/21/05
- Epson Stylus Pro 9800: SW0185A_q - Released 10/21/05
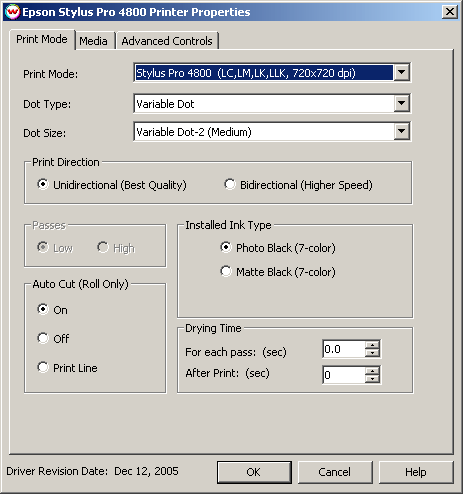
Print Mode:
Pressing the Properties button next to the Printer Model window on the
Imaging Configurations screen will launch a control panel for this printer.

This page of the properties sheet allows you to select a print mode, the dot size, the
print direction, passes, and time between passes.
- Print Mode: Select the inks and printing resolution
- Dot Type: Select from Fixed or Variable dot types. When the print mode is changed
this selection will default to the suggested dot type (usually variable)
- Dot Size: Select the size of the dot
- Fixed modes: The following are the available dot sizes. Each of these dot sizes are available at all resolutions except for 2880x1440 and 2880x2880.
- Fixed - 3.5pl
- Fixed - 5.9pl
- Fixed - 7pl
- Fixed - 12.5pl
- Fixed - 15pl
- Fixed - 20.8pl
- Variable modes: There are three choices for variable dot sizes available for all resolutions except 2880x1440 and 2880x2880. When the print mode is changed this selection will default to the suggested variable dot size for the selected resolution.
- Variable Dot-1 (Dark)
- Variable Dot-2 (Medium)
- Variable Dot-3 (Light)
- Print Direction: Print in one direction for the best quality (Unidirectional) or
in both directions for higher speed (Bidirectional)
- Passes: At a resolution of 1440x720 this control will be active. Choose "High" for a better
quality and low for better speed.
- Ink Type:
- Photo Black (7-color) supports the most general use and is best for glossy papers
- Matte Black (7-color) Not recommended for glossy/semi-glossy media
- Auto Cut: Select whether to cut the image or print a line in order to cut by hand later on
- Drying Time:
- Each Pass: Time Between Passes allows you to set a drying time between each
pass. This is especially useful when printing on film.
- After Print: Set a drying time after the print has completed. Cutting will
commence after the set drying time.
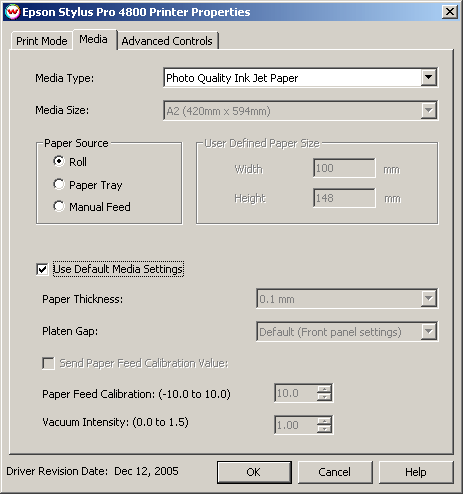
Media:
When you click on Media, the following properties page will be displayed:

The Media page controls media type, media size, the feed source and allows you to select options to
fine tune the type of media installed.
- Media Type: Choose from a list of approved Epson media. If your media is not
in the list, choose the closest match. If there is nothing close, choose "Third Party Media"
and the Media Settings will be available to fine tune the parameters
- Media Size: Choose from a list of media sizes. If nothing matches, choose "User Defined"
and set the size in the "User Defined Paper Size" box.
- Paper Source Select the feed source for the media. The paper tray selection does not exist
on the 7800 and 9800.
- Use Default Media Settings Uncheck to have full control over media settings
- Paper Thickness
- Platen Gap
- Send Paper Feed Calibration Check to send a value for a media feed calibration
- Paper Feed Calibration
To find the Paper Feed Calibration Value:
- Print a line that is 1000 mm long in the paper feed direction
- Measure the actual printed distance
- Enter the difference in millimeters. For example, enter -5 if a measurement of the print is
a value of 995 mm
- Vacuum Intensity Sets the suction intensity of the vacuum with 1.0 equal to 100 percent.
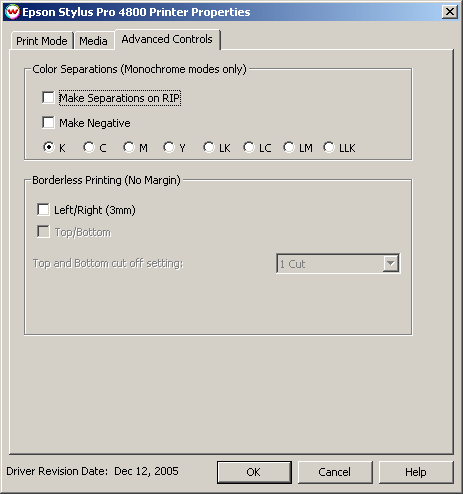
Advanced/Color Separations:
When you click on Advanced/Color Separations, the following Properties page will be displayed:
 Color Separations
The Color Separations controls become active when a Monochrome mode is selected and Variable Dot is not selected.
Also on this tab are controls for the Borderless Printing option. This option allows you to
output prints without any margins or borders. This is done by overprinting and then cutting into the print
for the top and bottom, and overprinting into pads inside the printer for the left and right sides.
Borderless Printing
- Marginless printing is only valid for the following media widths:
- Epson Stylus Pro 4800
(8", 8.25", 8.5", 10", 12", 13", 14", 16", 16.5", 17", 203.2/210/216/257/297/300/329/355.6/400/420/431.8mm)
- Epson Stylus Pro 7800
(10", 13", 16", 17", 24", 254/300/329/406.4/431.8/515/594/609.6mm)
- Epson Stylus Pro 9800
(10", 13", 16", 17", 24", 36", 254/300/329/406.4/431.8/515/594/609.6/728/914.4/1117.6mm)
- User should make the horizontal width of the image 3mm wider on both the right and left edges (6mm total)
of the image to avoid white area caused by media skew. These areas are printed off the edge of the
paper on the absorbing pad on the platen. No automatic scaling or magnification is done by either
SoftRIP or the printer.
Note: You should have the paper width set to 6mm (.235") greater than the width of the
paper. This may require first selecting the borderless printing option in the properties and
secondly setting the paper width (or selecting Set Maximum Width) in the setup screen.
- Top and Bottom cut off setting: Select the type of cut desired.
- 1-Cut: Performs a quick cut with minimum waste between pages, but it may be slightly off of horizontal.
- 2-Cut: Cuts the image perfectly, but wastes space between pages.
 Epson Stylus Pro 4800/7800/9800
 Epson Stylus Pro 4800/7800/9800

