 Epson SureColor F7200 Help Page
August 05, 2015
Important notes:
- For optimal quality when printing, it is recommended to use the 'Custom Paper Settings' option in the 'Paper Menu' menu on the front panel of the printer to setup a new Paper Setting (1-30).
- When the selected Paper Setting on the front panel of the printer is set to '0: RIP Settings', the settings in SoftRIP will be used by the printer but the quality of prints may not be optimal, as 'Head Alignment' and other front panel media options may not function properly.
The settings for the following controls in SoftRIP will be overridden when Paper Setting 1-30 is selected on the front panel of the printer:
- Carriage Movement
- Overprint
- Drying Time: for each pass
- Platen Gap
- Paper Feed After Print
- Paper Feed Speed
- Takeup Reel Tension
- Paper Feed Calibration
- Roll Tension
- Vacuum Intensity
- Optional Dryer
- Feed Speed between data ('Blank Area Feed' on the front panel of the printer)
- After Heater
- When selecting an Imaging Configuration for the printer, ensure that the settings from the 'Info' selection in the 'Imaging Configuration' window are entered correctly into the currently selected media on the front panel of the printer. These settings can be accessed from the main interface for SoftRIP by clicking on 'Print', then 'Setup', selecting the Imaging Configuration you would like to use, clicking 'Edit' and then the 'Info' button in the 'Imaging Configuration' window. An example image showing this can be found here.
Print Mode:
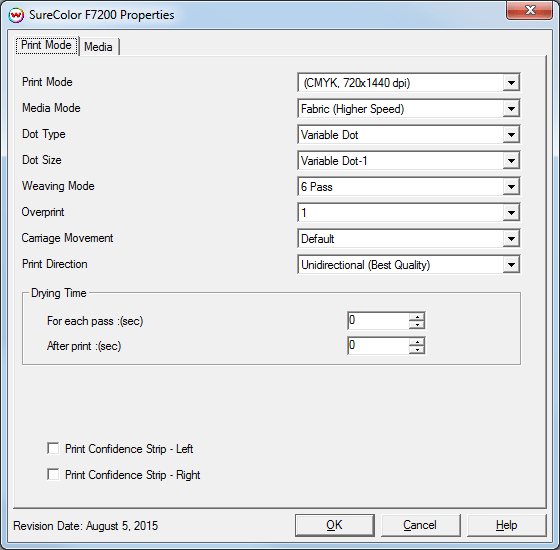
- Print Mode: Select the ink type and resolution for printing.
- Media Mode: Select between 'Fabric (Higher Speed)' and 'Rigid Media (Higher Quality)' modes. Selecting 'Rigid Media (Higher Quality)' reduces the dot size being used and reduce the printhead speed. 'Rigid Media (Higher Quality)' mode is intended to increase the print quality when sublimating to rigid substrates. For non-rigid substrates, 'Fabric (Higher Speed)' mode should be used.
- Dot Type: Select between Fixed Dot and Variable Dot.
- Dot Size: Select between the available Fixed Dot and Variable Dot settings.
- When 'Dot Type' above is set to 'Variable Dot', a different Variable Dot selection is available for each 'Media Mode' option.
- When 'Dot Type' above is set to 'Fixed Dot', three Fixed Dot selections are available for each 'Media Mode' option.
- Weaving Mode: Set the weaving mode to the appropriate pass count for printing.
- Overprint: The number of times each area is printed over. A setting of 2 would double the ink.
- Carriage Movement: Select if the print head should travel only the distance of the data sent or the width of the printer.
- Print Direction: Print in one direction for the best quality (Unidirectional) or in both directions for higher speed (Bidirectional)
- Drying Time: The following additional controls for drying are available.
- For each pass: (sec): Set a drying time (in seconds) between each pass.
- After Print: (sec): Set a drying time (in seconds) after the print has completed.
- Print Confidence Strip: Select whether to print a confidence strip on the left side, right side or both.
Media
When you click on the Media tab, the following properties page will be displayed:
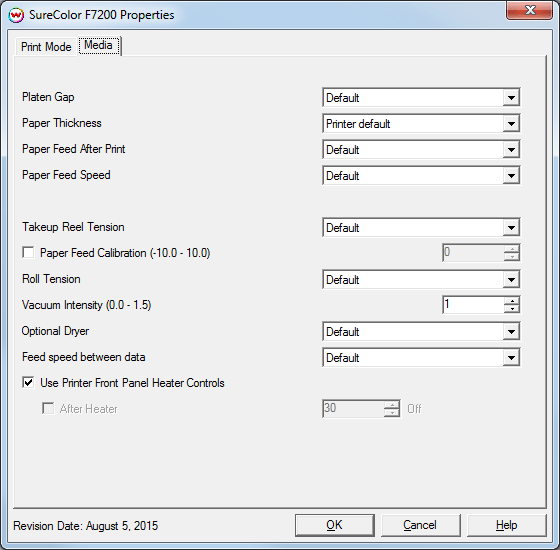
The Media page allows you to fine tune the settings for the media loaded on the printer.
- Platen Gap: Select the platen gap distance (the distance between the print head and the media).
- Paper Thickness: Select the thickness of the media.
- Paper Feed After Print: Select if the media should be advanced onto the heater after printing.
- Paper Feed Speed: Set the paper feed speed.
- Takeup Reel Tension: Select the takeup reel tension level.
- Paper Feed Calibration: Check to send a percentage value for a media feed compensation.
To find the Paper Feed Calibration Value:
- Print a line that is 1000 mm long in the paper feed direction.
- Measure the actual printed distance.
- Enter the percentage difference. For example, enter -1 if a measurement of the print is a value of 990 mm (-1% difference).
- Roll Tension: Increase tension if creases appear in media during printing.
- Vacuum Intensity: Sets the suction intensity of the vacuum from 0 - 1.5.
- Optional Dryer: If the printer is installed with the add-on dryer, these controls will enable or disable the dryer.
- Feed speed between data: If print data contains a horizontal blank area, the printer quickly feeds past this area to save time.
- Use Printer Front Panel Heater Controls: Enables the After heater controls to be controlled by Wasatch SoftRIP.
After Heater: Adjust heater temperature in degrees centigrade.