 Afinia LT5C
June 23, 2021
Print Mode Options
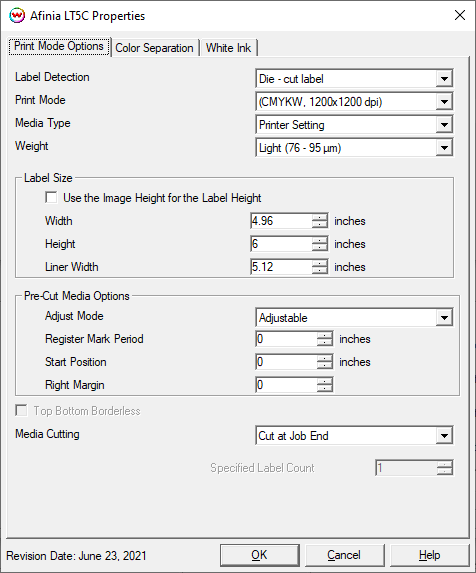
Pressing the Properties button next to the Printer Model window on the Imaging Configurations screen will launch the control panel for this printer.

- Label Detection:
When loading the media on the printer you'll need to select a 'Media Form' on the front panel of the printer. Set this control to the same setting as the printer front panel.
- Continuous paper: For non-label media or media where the liner is the same width as the media. Prints with minimal physical margins.
- Continuous paper with black mark: Same as above but with the printer set to detect black marks on the media.
- Continuous label: For label media where the liner is wider than the printable surface.
- Continuous label with black mark: Same as above but with the printer set to detect black marks on the media.
- Die-cut label: For Die-cut media with a label gap to be detected by the printer.
- Die-cut label with black mark: Same as above but with the printer set to detect black marks on the media instead of the die-cut label gap.
NOTE: For media that has a black mark or a die-cut label gap that will be detected by the printer, the media sensor needs to be trained. Please refer to the manufacturer documentation for further information on how to train the media sensor.
- Print Mode: Select the inkset and printing resolution.
- Media Type: Set the type of paper. Setting changes the speed of printing and toner fusing temperature.
- Weight: Set the media weight. Setting changes the speed of printing and toner fusing temperature.
- Label Size:
- Use Image Height For Label Height: Enable to use the height of the image as the height of an individual label. When enabled, depending on the type of print job, this will include the Print Setup top and bottom margins as well as vertical gaps set on the Layout tab or in a Fast Layout.
- Width: Place the physical width of the media here. If the media has a liner, enter the width of the printable surface.
- Height: Input the height of a single label. Disabled when "Use Image Height..." is enabled.
- Liner Width: When using adhesive label media with a liner, place the full physical width of the media, including the liner, here. There is a minimum of 2 millimeters per side greater liner width than the printable surface width required by the printer.
NOTE: There is a minimum individual label size of 0.5" and a maximum individual label size of 52".
- Adjust Mode: Allows control of the printer's Adjust settings when printing with marked media. See additional details on how to setup and correctly use this control later in this document.
- Register Mark Period: When using Adjustable, measure the distance from the top of one mark (or label gap) to the top of the next mark on the marked media. Place this measurement here before printing.
- Start Position: Used to fine tune position of printed label relative to marked media. If after printing a job you need to offset the position of printing, enter a value here.
- Right Margin: Set a right margin in which no printing will occur on the media.
- Top Bottom Borderless: Available with "Continuous" media only. When enabled the media will be cut to create a "borderless" print.
- Media Cutting: Set to have cutting at the end of a print job or after a specified number of labels.
- Specified Label Count: When Media Cutting is set to cut after a specified number of labels, enter the number here.
NOTE: The smallest individual cut frame is 4" tall. If the height of a single label is between 0.5" and 4", the resulting printed media will be 4" tall. If multiple copies of the label are printed, cutting will occur after the label count that exceeds the 4" minimum height limit.
White Ink
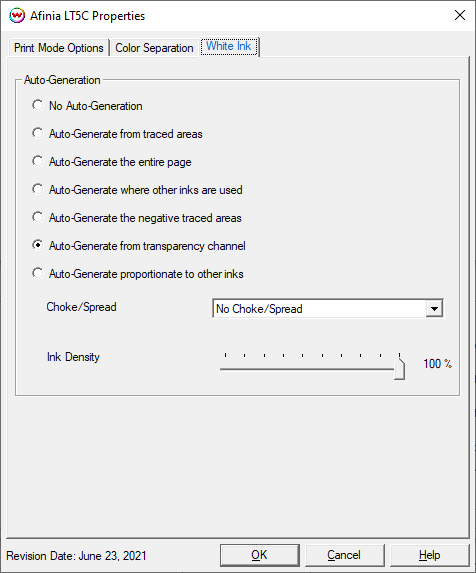
The White Ink controls are located on the second tab when a CMYKW inkset is selected.

- No Auto-Generation: White channel is not printed unless specified through spot color replacement or as an Alpha or Spot channel.
- Auto-Generate from traced areas: White ink will be printed only to the traced areas that have been set using the Trace tab in the main SoftRIP interface.
- Auto-Generate the entire page: White ink will be printed under the entire image.
- Auto-Generate where other inks are used: White ink will be printed under all non-zero pixels (marked areas). In addition, a "choke" or "spread" may be selected.
- Auto-Generate the negative traced areas: White ink will be printed only to the non-traced areas that have been set using the Trace tab in the main SoftRIP interface.
- Auto-Generate from transparency channel: White ink will print based on the artwork's transparency channel. Opaque pixels will print white while partially transparent pixels will print as an inverse of the transparency setting.
- Auto-Generate proportionate to other ink: Generates the unmanaged ink based on a negative of the total amount of all managed inks. For example, if CMYK channels are each equal 100% ink (for a total of 400% ink), the unmanaged channel with be 0%. If CM are 100% and YK are 0% (for a total of 200% ink) the unmanaged channel will be 50%, and if CMYK inks equal 0%, the unmanaged channel will equal 100%. You can adjust the transforms for the unmanaged ink by using the Calibration and Press curves in the Color Transforms window.
Note: A choke shrinks the White ink channel in relation to the printed area.
Note: A spread expands the White ink channel in relation to the printed area.
- Ink Density: Set percentage of White ink to be used. Can be set from 10% to 100%.
Color Separation
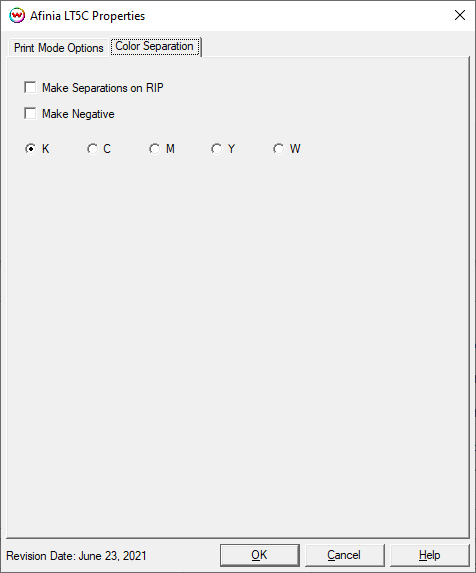
The Color Separation controls are located on this tab.

- Make Separations on RIP: This will cause the RIP to separate the image into CMYK plates.
- Make Negative: This inverts monochrome images when printed.
- KCMY: This allows you to print monochrome images to any of the heads in the printer. This is especially useful to eliminate overuse of a single printhead when printing only monochrome.
Copy Count and Workflow Important Notes
When multiple copies of identical image data is to be printed, SoftRIP can spool a small sub-set of this data to the printer and instruct it to print this data the number of requested times; decreasing the total amount of data sent to the printer for the print job. For large print jobs, this can significantly decrease the time it takes to spool the print job, allowing the job to start printing sooner. We call this logic "Copy Count".
When using Copy Count, use the Bottom Margin control on the Print Setup window to set the space between each copy.
When using the Layout tab, to set the space between individual images, use the gap controls on the Unit Options tab. To keep spacing consistent, be sure that the value for Bottom Margin in the Print Setup matches the value used for the vertical gap.
When Adjust mode is enabled a typical workflow is to print identical sized labels to fit within a pre-marked or pre-cut label frame. It is also possible to print labels where the size varies slightly, as long as the size of any one label does not exceed the label frame size. For example, if a standard 4 x 6" label size is loaded on the printer, placing images 4 x 6" in size or smaller on the Layout tab will resulting in each image being appropriately printed within the frame.
To use this workflow, after entering the desired settings in the Printer Properties, place the images you wish to print on the Layout tab. Then RIP and Print. The gaps between the images will be automatically set according to the values input into the Printer Properties.
When label detection of black marks or die-cuts has been enabled (Adust Mode), when measuring the media to determine the values to input into the Printer Properties, it is recommended to always round down to the nearest measurement in millimeters. For example if I were to measure a register mark period of 125.75 mm, I'd enter 125 mm. The same concept will apply to other units of measure. By rounding down you'll allow the printer enough room in which to adjust printing relative to the detected media. Rounding up is not recommended as this may artificially result in the printer determining there isn't enough room for the printed image. Unexpected printing results could result.
When printing a layout with mixed images, the copy count logic cannot be used by the printer because of the unique nature of the data. When not printing duplicate prints of one label, a lot more data needs to be spooled to the printer. This data needs to be fully received by the printer before printing starts. Depending on the total size of the layout being sent, the spooling process can take a significant amount of time.


