 HP Latex 360
Feb 19, 2015
Special Note on color management:
This printer is capable of creating ICC profiles using the onboard spectrophotometer. Profiles created using the printer's onboard measuring device are created independent of Softrip. Due to this users must not apply calibration curves, press curves, ink reductions, or ink limits in the Color Transforms window. Any color transform applied in Softrip will invalidate the ICC profile created by the printer. When selecting a Substrate Name and Printer Paper Mode on the driver properties page you will be prompted to download an ICC if one is available. Using a third party profiling software to create profiles is also supported. When using this workflow select 'Use RIP Settings' as the Printer Paper Mode. Instructions on using the onboard measuring device to linearize can be found at the bottom of this page.
Special Note on printing multiple copies:
When printing more than one copy of a print queue item it is recommended to add the print queue item to a layout and add the appropriate number of copies. Once the copies are added to the layout then print the layout. This will be significantly more efficient and total print time will be less than queuing up multiple copies from the Queues tab.
Print Mode:
Pressing the Properties button next to the Printer Model window on the
Imaging Configurations screen will launch a control panel for this printer.

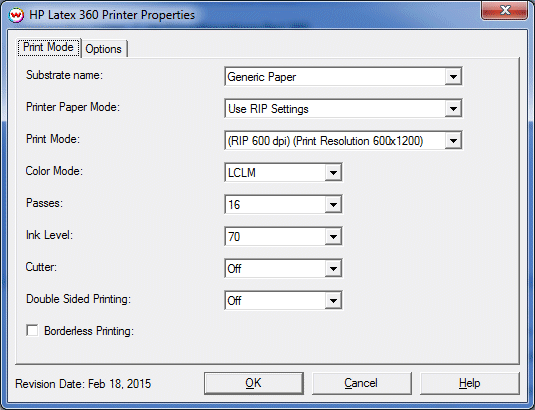
- Substrate name: Select the media type currently loaded on the printer.
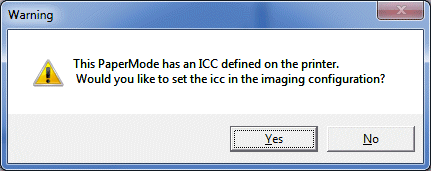
- Printer Paper Mode: Select the Paper Mode created on the front panel of the printer or downloaded from HP's site. If no Paper Mode has been created select 'Use RIP Settings. When selecting a Paper Mode that has an ICC profile created by the printer a message will appear asking whether the ICC should be applied to the current Imaging configuration. See Illustration #1 below.
- Print Mode: Select the desired resolution for the printing process. Note: both the rip resolution and the print resolution will be displayed.
- Color mode: Choose either CMYK or LCLM. When printing with a Printer Paper Mode created from the front panel the Color mode will be restricted to the option selected when the Printer Paper Mode was created.
- Passes: Select the number of passes to use during printing. Available options will vary depending on the Print Mode currently selected.
- Ink level: Set a percentage amount of the overall ink to use for printing. The values available will vary depending on the Substrate selected.
- Cutter: Enable cutting of the material after each print job.
- Double Sided Printing: Select the correct dual sided printing option. Off, Side A, or Side B. Setting the printers front panel to match this value is required.
- Borderless Printing: Check to enable borderless printing. The printer requires a special platen to be installed before sending a borderless printing job, refer to HP's users guide for more detail.

Illustration #1
Options:

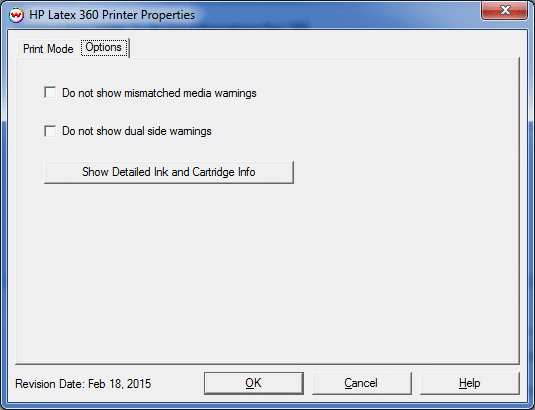
- Do not show mismatched media warnings: Disable prompt when media type in SoftRIP does not match media type selected on front panel of the printer.
- Do not show dual side warnings: Disable prompts related to dual sided printing.
- Show Detailed Ink and Cartridge Info: Pressing this button displays detailed information about the print heads and ink cartridges loaded into the printer.
Densitometry:
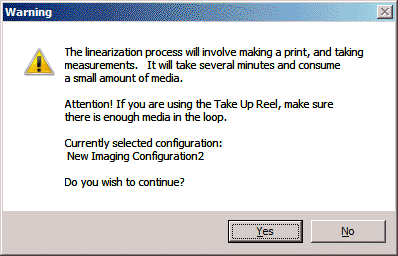
Linearization data can be saved in Softrip by selecting 'HP Designjet Calibration' from the Color drop down menu in Softrip's main UI. Linearization can also be created on the front panel when creating a new Paper Print Mode. Linearization should only be created using only one of these two options, never both. After selecting the 'HP Designjet Calibration' option you will see the window shown below.

Ensure the Substrate name setting on the front panel matches the Substrate name setting on the properties page of the driver in SoftRIP, and the physical connection is correct. Click 'Yes' and the printer will start printing the linearization target and scan the target after the dry time. Once the printer is done scanning the target a 'Save Imaging Configuration' prompt will be shown allowing the scanned data to be saved as part of the current Imaging Configuration or to a new one.
NOTE: Total time for the linearization process may exceed 20 minutes.
 HP Latex 360
 HP Latex 360


