 Creating Hi-Fi Ink Print Modes
Introduction
Certain printer models such as the ColorSpan DisplayMaker, Mimaki JV-2, and
Mutoh Falcon, will allow you to create new print modes using Hi-Fi inks other
than Orange/Green. For example, if you might want to print using CMYK plus Red,
Blue, Medium Cyan, Medium Magenta, Light Cyan, and Light Magenta. This tool
allows you to enter the colorimetry needed for Wasatch SoftRIP to effectively use
these inks.
To create a new mode or "inkset", you must have a supported colorimeter (Gretag Spectrolino, SpectroStar SpectroCam, Color Savvy Color Mouse, X-Rite DTP22) or have a way to obtain CIE XYZ color data from another source.
IMPORTANT! To ensure that you create a valid inkset, please read the instructions
carefully to avoid printing inks in the incorrect order!
Before you begin: Print out a test patch with all of the colors.
Before you can begin creating a new inkset, you must first print out a test patch for all of the colors.
Select an inkset that has at least as many unique colors as the inkset you
would like to create (this does not include light or medium inks). For our
example, the inkset has 6 unique colors (Medium Cyan and Light Cyan are dilute
versions of Cyan, and Medium Magenta and Light Magenta are dilute versions of
Magenta), so we must select an inkset with at least 6 colors. To make this selection, click on the Properties button on the Imaging Configurations screen to launch the controls for the specific printer. (The below example is from the ColorSpan Properties
Window.)
 Print out 'DTP41_8color.ps' (which is located in the 'psfiles' folder from the root of the drive SoftRIP is installed on). Select the 'none' Imaging Configuration prior to printing. This is a unique file which prints directly to each head and permets an accurate measurement of the maximum density of each color.
If you do not have a supported colorimeter:
If you do not have a supported colorimeter, you must measure the CIE XYZ color
data using another colorimetry program for only the patch with the maximum
density of each unique color. (On DTP41_8color.ps, this is the square number 0 of
each color). Write these values down, as you will need to enter them in
manually.
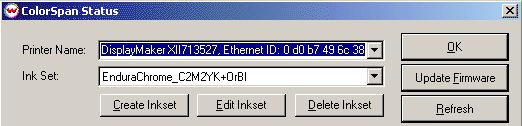
Click on the Properties button on the Imaging Configurations screen to launch the controls for the specific printer. Then, click on Create Inkset. The following window will appear:
Print out 'DTP41_8color.ps' (which is located in the 'psfiles' folder from the root of the drive SoftRIP is installed on). Select the 'none' Imaging Configuration prior to printing. This is a unique file which prints directly to each head and permets an accurate measurement of the maximum density of each color.
If you do not have a supported colorimeter:
If you do not have a supported colorimeter, you must measure the CIE XYZ color
data using another colorimetry program for only the patch with the maximum
density of each unique color. (On DTP41_8color.ps, this is the square number 0 of
each color). Write these values down, as you will need to enter them in
manually.
Click on the Properties button on the Imaging Configurations screen to launch the controls for the specific printer. Then, click on Create Inkset. The following window will appear:
 Step 1: Give the inkset a name, choose the number of colors, and set up your
colorimeter:
a) Enter a descriptive name for the inkset, as shown above.
b) Enter the number of unique colors in the inkset. (This is the total
number of inks minus the number of light and medium inks.) If you have two or three
sets of the same ink installed in the printer, enter each color only once.
c) If you have a supported colorimeter, click on Select Colorimeter, and
choose the device that you have. Choose the port where the device is attached and
click OK. If the colorimeter is connected properly, the window will display 'Device Initialization Successful'.
After you have completed these three steps, click on Next.
The following window will appear:
Step 1: Give the inkset a name, choose the number of colors, and set up your
colorimeter:
a) Enter a descriptive name for the inkset, as shown above.
b) Enter the number of unique colors in the inkset. (This is the total
number of inks minus the number of light and medium inks.) If you have two or three
sets of the same ink installed in the printer, enter each color only once.
c) If you have a supported colorimeter, click on Select Colorimeter, and
choose the device that you have. Choose the port where the device is attached and
click OK. If the colorimeter is connected properly, the window will display 'Device Initialization Successful'.
After you have completed these three steps, click on Next.
The following window will appear:
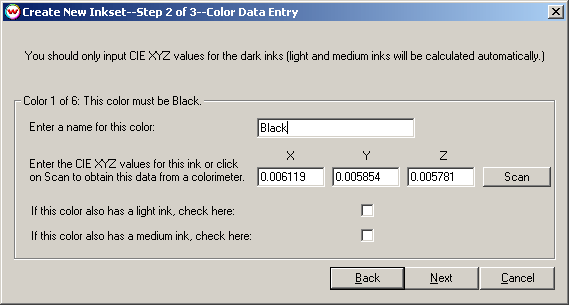 Step 2: Enter the color data:
This is the data entry window, into which you must enter the name of the
color, the CIE XYZ color data values read from the printed test strip, and select
whether or not this color has a corresponding dilute ink. This screen will
appear as many times as the number of unique colors that you entered into the
previous screen. The window will show what color you are working on (the above
example shows 1 of 6).
IMPORTANT: The first 4 colors entered into this screen MUST be in the following order:
Black, Cyan, Magenta, and then Yellow. If you are printing on fabric,
Turquoise and Red may be substituted for Cyan and Magenta. After the first 4 colors
have been entered, it does not matter in what order the other colors are
entered. You should NOT enter data for any light or medium (dilute) inks, since these
are only dilute versions of the same color.
a) Enter the name for the color. The name of the first 4 colors will be
automatically populated for the sake of convenience.
b) Click on Scan to measure the printed sample of this color, or enter the data manually in the order X, Y, Z.
c) If this color has a light ink, then check the box for light ink. If the
color has both a medium and light ink, check both boxes. (For example, if you
are printing using CMYK + Light Cyan, Light Magenta, the light ink box should be
checked for light ink, but the box for medium ink should be left blank. If
you are printing using CMYK + Medium Cyan, Medium Magenta, Light Cyan, and Light
Magenta, you should check both the light and medium inks.)
Click on Next to proceed to the next color.
After all of the colors are entered, click on Next. The following
window will be displayed:
Step 2: Enter the color data:
This is the data entry window, into which you must enter the name of the
color, the CIE XYZ color data values read from the printed test strip, and select
whether or not this color has a corresponding dilute ink. This screen will
appear as many times as the number of unique colors that you entered into the
previous screen. The window will show what color you are working on (the above
example shows 1 of 6).
IMPORTANT: The first 4 colors entered into this screen MUST be in the following order:
Black, Cyan, Magenta, and then Yellow. If you are printing on fabric,
Turquoise and Red may be substituted for Cyan and Magenta. After the first 4 colors
have been entered, it does not matter in what order the other colors are
entered. You should NOT enter data for any light or medium (dilute) inks, since these
are only dilute versions of the same color.
a) Enter the name for the color. The name of the first 4 colors will be
automatically populated for the sake of convenience.
b) Click on Scan to measure the printed sample of this color, or enter the data manually in the order X, Y, Z.
c) If this color has a light ink, then check the box for light ink. If the
color has both a medium and light ink, check both boxes. (For example, if you
are printing using CMYK + Light Cyan, Light Magenta, the light ink box should be
checked for light ink, but the box for medium ink should be left blank. If
you are printing using CMYK + Medium Cyan, Medium Magenta, Light Cyan, and Light
Magenta, you should check both the light and medium inks.)
Click on Next to proceed to the next color.
After all of the colors are entered, click on Next. The following
window will be displayed:
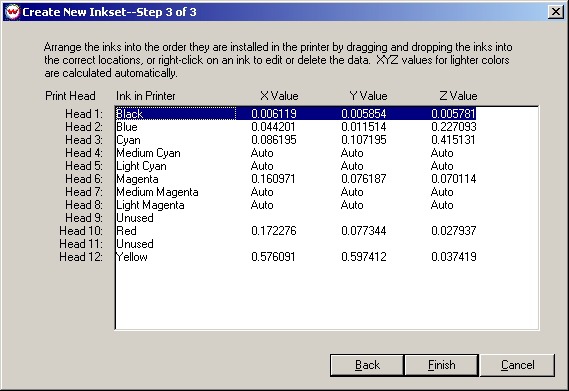 Step 3: Order the inks as they are installed in the printer:
This screen will automatically display all of the ink data that you have entered. You must then move the inks into the correct order that they are installed in the printer. If a head is unused, make sure that under the 'Ink in Printer' column, it says 'Unused' In the above example, heads 9 and 11 are unused (the printer has inks installed in these heads that we do not want to print with in this mode or does not
have an ink installed in this position).
If you double-click on an entry in the list, it will allow you to edit that
color. If you right-click on an entry in the list, you can edit that color or
delete the color from the inkset. If you right-click on an 'Unused' slot, you can add a new color to the inkset.
When you are finished rearranging the inks, click on Finish. The inkset is
now finished.
After you have created the inkset, you should linearize and profile the printer for the best color output.
Editing an existing inkset:
If you would like to edit an existing inkset, launch the printer controls by clicking the Properties button next to Printer Model on the Imaging Configuration screen. Click on 'Edit Inkset'. Step 3 of the 'Create New Inkset' wizard will be displayed. Double-click or right click on any of the inks to edit or delete the related data.
When you click on Finish, you will be asked whether you want to overwrite the
existing inkset or save this inkset with a new name. If you click on 'No', you will have to enter a new name for the inkset.
Step 3: Order the inks as they are installed in the printer:
This screen will automatically display all of the ink data that you have entered. You must then move the inks into the correct order that they are installed in the printer. If a head is unused, make sure that under the 'Ink in Printer' column, it says 'Unused' In the above example, heads 9 and 11 are unused (the printer has inks installed in these heads that we do not want to print with in this mode or does not
have an ink installed in this position).
If you double-click on an entry in the list, it will allow you to edit that
color. If you right-click on an entry in the list, you can edit that color or
delete the color from the inkset. If you right-click on an 'Unused' slot, you can add a new color to the inkset.
When you are finished rearranging the inks, click on Finish. The inkset is
now finished.
After you have created the inkset, you should linearize and profile the printer for the best color output.
Editing an existing inkset:
If you would like to edit an existing inkset, launch the printer controls by clicking the Properties button next to Printer Model on the Imaging Configuration screen. Click on 'Edit Inkset'. Step 3 of the 'Create New Inkset' wizard will be displayed. Double-click or right click on any of the inks to edit or delete the related data.
When you click on Finish, you will be asked whether you want to overwrite the
existing inkset or save this inkset with a new name. If you click on 'No', you will have to enter a new name for the inkset.