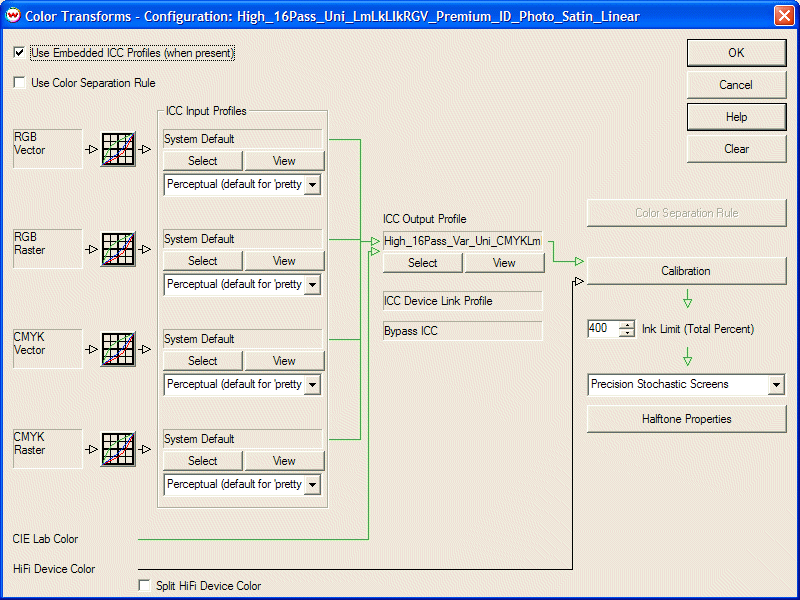
Illustration 1: Halftone Method is the last control in the flow chart
Change the halftone method for your Imaging Configuration using the dropdown window in the lower right hand side of the Color Transforms screen (Illustration 1). Launch additional controls for most halftone methods by pressing the Halftone Properties button beneath the dropdown window.

Illustration 1: Halftone Method is the last control in the flow chart
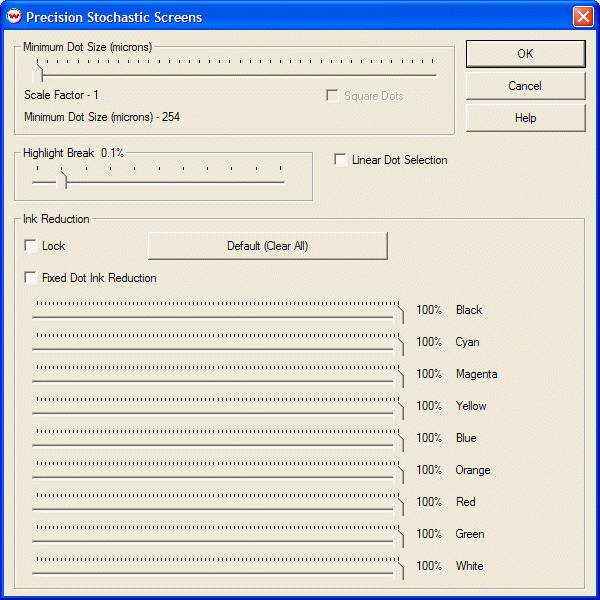
If the current Halftone Method is Precision Stochastic Screens, pressing the Halftone Properties button will produce the controls shown in Illustration 2.

Illustration 2: Controls for Precision Stochastic Screens
Minimum Dot Size rescales the halftoning function to enlarge dots. This is illustrated by the three gradients shown at the end of this document. A scale factor of '1' is the finest selection, and will produce the best output in most situations. Enlargement of dots creates a "coarser" print, but it also drastically reduces dot gain, which may be helpful in particular situations. See the footnote below.
Square Dots affects the shape of dots formed when dot size is scaled. For devices where dpi is the same horizontally as vertically, this control is grayed out and does nothing. For other devices, such as an Epson at 1440 X 720 dpi, it is active and available.
When Square Dots is checked, it modifies the behavior of the scale slider bar. It computes different scale factors on X and Y to try to keep the scaled-up dots as square as possible for integer scale factors. This prevents "squashed dots" from appearing as dot size is increased on these printers.
Highlight Break can be set to prevent thinly scattered dots in highlights. This is a problem that can be caused by 16-bit deep rendering, where the halftoning of as little as one hundredth of one percent can cause scattered dots that are not perceived as color. A setting of 0.4% models the highlight break naturally caused by older 8-bit printing workflows.
Ink Reduction can be set independently for every color, just four channels for CMYK printers, or more channels for hifi color printers, as shown in the illustration. With certain media, this can be is a valuable first step in the construction of imaging configurations.
Linear Dot Selection changes the dot selection rules for variable-dot (grayscale) print heads to a simple "closest match" rule. Checking this box may improve mid-tone "graininess" with grayscale print heads such as Xaar Omnidot. It is generally a bad idea to use it with any variant of Epson print heads. It should not be used with fixed-dot print heads, and especially not with fixed-dot print heads and dilute inks, where it can make ink reduction nearly impossible.
Fixed Dot Ink Reduction changes the way that the Ink Reduction sliders are interpreted by the halftoning algorithm. It should be checked for "Fixed-Dot" devices only, because it will produce confusing results with "Variable-Dot" printers, such as those based on Epson print heads. It is specifically intended for fixed-dot devices that use dilute ink, such as light cyan and light magenta. It has no effect where light inks are not used. Checking this control for the intended type of printer makes it possible to use very large ink reductions.
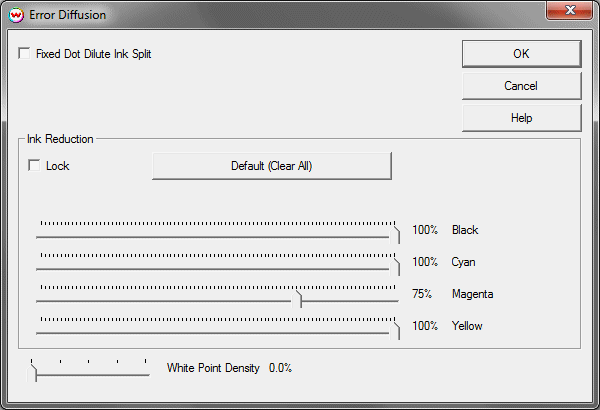
If the current Halftone Method is Error Diffusion, pressing the Halftone Properties button will produce the controls shown in Illustration 3.

Illustration 3: Controls for Error Diffusion
Error Diffusion uses no threshold arrays, and is free of any periodic patterning associated with such arrays. This halftone fully supports 16-bit rendering, and can also support variable dot devices with up to 16 different dot sizes.
In its default mode (without "dilute ink split" selected), it performs a simple "Linear Dot Selection", like that produced by that control in PSS.
It will work well in this default mode for all variable-dot devices, and also for fixed dot devices that do not use dilute inks.
The control for White Point Density can be used to reduce "graininess" in photographic prints by ensuring that dots be kept slightly closer together in highlights.
Fixed Dot Dilute Ink Split (Error Diffusion only)
For Error Diffusion on fixed dot devices that use dilute inks, we recommend checking the control labeled, "Fixed Dot Dilute Ink Split". This is necessary to support effective strong ink reductions for those devices.
When this control is checked, on a device that includes both Cyan and Light Cyan inks, incoming Cyan data is duplicated onto two channels, and those two channels are halftoned completely independently. Because there is no spatial correlation between the Cyan and Light Cyan halftones, this may look more "grainy" on devices with really excellent registration of dots between color channels. On most grand-format devices, where we expect this feature to see the most use, this will probably not be much of an issue.
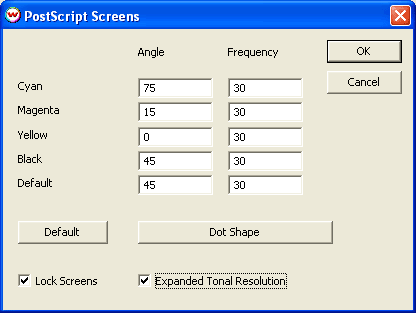
If the current Halftone Method is PostScript Screens, pressing the Halftone Properties button will produce the controls shown in Illustration 4.

Illustration 4: Controls for PostScript Screens
You may enter the desired halftone screen frequency and angle in these boxes. If you are unsure what to enter, simply pressing Default will set some reasonable numbers, which are fairly safe with almost all the devices used with Wasatch SoftRIP.
If Lock Screens is checked, these settings will be used regardless of any attempt by PostScript jobs to set their own screens. If it is not checked, these settings will be defaults and will only be used on files that do not set their own screens.
"Expanded Tonal Resolution" can be useful if you are trying to use your wide format printer to produce color separations for other printing processes. When using a low dpi (600 to 720 dpi) device to make color separations, a common problem is the limitation of tonal resolution or available grays. This shows up as tonal banding on the film. When Expanded Tonal Resolution is not checked, your PostScript screens will be limited by a well-known formula: maximum grays = (dpi / lpi) squared. By checking "Expanded Tonal Resolution" you can substantially remove this limitation, producing smoother gradations at higher lpi's.
See the Color Separations section of online help for a more extensive discussion of the use of PostScript screens.
The Minimum Dot Size control rescales the halftoning function to enlarge dots. This is illustrated by the three gradients shown at the end of this document. A scale factor of '1' is the finest selection, and will produce the best output in most situations. Enlargement of dots creates a "coarser" print, but it also drastically reduces dot gain, which may be helpful in particular situations.
Dot gain can make printers so non-linear that it is nearly impossible to construct calibration curves. Reduction of dot gain helps with this. Dot gain is also subject to fluctuations from effects like humidity and variations in paper surface. Anything that reduces dot gain makes color more repeatable.
When inkjet printers are operated at high speeds (low pass counts) horizontal "banding" often results from the difference between "wet on dry" and "wet on wet" printing at the edges of the printer swaths. Enlarging dots can be quite valuable for high speed printing of signage to be viewed from a distance, where the reduction of "banding" is more significant than the "coarser" screen.
Finally, large dots can be valuable when an inkjet printer is used to make color separations for processes such as screen or flexo printing. With dots that are larger than those in typical "FM" screening, this method should be a powerful option for the production of films for screen and flexo printing.

1X

2X

3X