Illustration 1: Image is wider than the printer
The tiling tool, available by selecting Tile in the left tabs, is used to produce multi-page (multi-panel) enlargements of prints where the desired output is wider than the width of the media or the printer.
Illustration 1: Image is wider than the printer
Illustration 1 shows an attempt to produce a print that is 100 inches wide on a printer that is only 44 inches wide. Whenever you specify a print that is too wide, the area that is unprintable is indicated on the screen by a flashing red hatch mark as shown here.
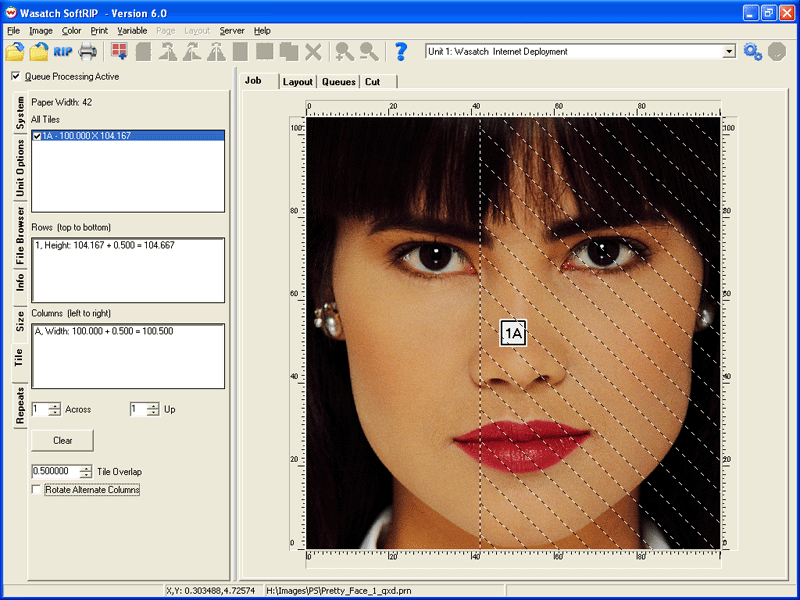
The simplest way to create evenly-spaced tiles is by incrementing the Across and Up fields to the number of desired tiles. By changing number of the Across tiles to 2, you'll get the screen shown in Illustration 2.

Illustration 2: Vertical line makes two tiles
You have now split the job into two tiles across, but there is still a flashing red pattern across portions of each tile because both of your tiles are still wider than the paper. By changing this number to 3, you will see the screen shown below in Illustration 3.

Illustration 3: Three equal tiles
Since the flashing red pattern has disappeared, the width of each tile (now 33.33 inches) is less than the width of the media. Tiles can also be defined by clicking the right button of the mouse over the image, and selecting either Cut Vertically or Cut Horizontally. After selecting Cut Horizontally, you'll see the screen shown in Illustration 4.

Illustration 4: Manually creating tiles
This image has now been tiled into rows (1 and 2) and columns (A, B, and C). You can change the width or height of a row or column in two ways. You can drag the lines by clicking on a line and dragging it to the location you would like. Alternatively, precise numeric values for the width and height of columns and rows can be entered by right-clicking on a tile, and selecting Adjust Column or Adjust Row.
A tally of all the tiles, rows, and columns is displayed on the left side of the window for your convenience. Note that each column has a width to which is added the Overlap. The sum of these is the actual width that will be printed. This overlap is specified with the Tile Overlap control and represents the overprint of each tile, providing a safety area for later trimming and alignment of the prints. Note that the center tile has two overlaps added (one for each side), while the other two tiles only have a single overlap, which will be printed on the edge that abuts another tile.
You can select or deselect individual tiles to print by simply clicking on individual tiles with the left mouse button or on the corresponding check mark under All Tiles. Full rows or columns can be toggled by clicking the right mouse button on a tile, and selecting Print Row or Print Column. Tiles marked with a red X will not be printed. In Illustration 5, tiles 1B, 1C, and 2C will be printed; 1A, 2A, and 2B will not.

Illustration 5: Tiles selected for print
If you proceed to process the currently displayed job, jobs will be added to the RIP queue. Each entry will have a name that indicates its original position. If Rotate Alternate Columns is checked, alternate columns of tiles will be rotated by 180 degrees. This is valuable with print modes that produce slightly different colors at right and left edges, reducing the visibility of this effect when tiled jobs are assembled.
You can now start to process these tiles by clicking on Print, then either RIP and Print, RIP Only, or Add to RIP Queue. It is also possible to add these tiles to a layout by clicking on Image, then Add to Layout.
After tiles have been added to the RIP Queue, individual tiles can be opened for adjustment of their overlaps. The overlap adjustment controls are found at the bottom of the RIP Queue window for the individual tile, as shown in Illustration 6.
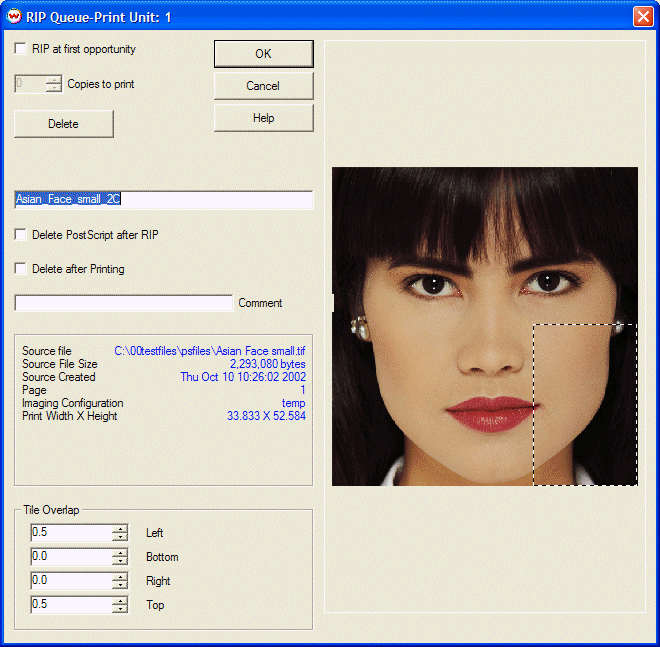
Illustration 6: Overlap adjustments on RIP Queue window