 SummaSign Pro
August 3, 2023
Notes:
Properties
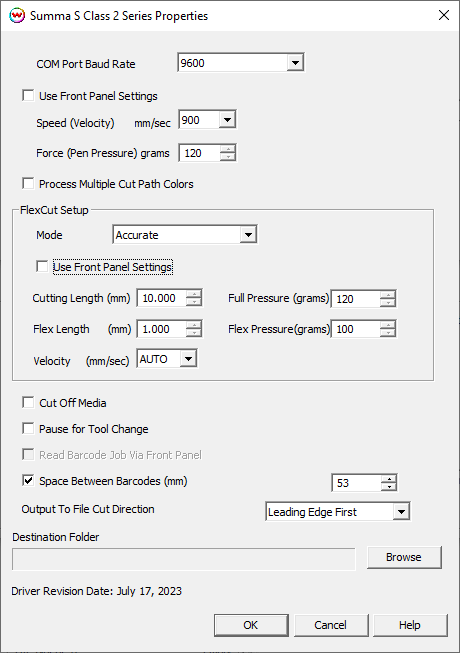
- COM Port Baud Rate: If connecting via COM ensure the front panel is set to the same Baud rate as this control.
- Use front panel settings: This control will respect all settings on the front panel for velocity, force, etc.
- Speed: Set the velocity for cutting Non-FlexCut paths in mm/sec.
- Force: Set the force for cutting Non-FlexCut paths in grams.
- Process Multiple Cut Path Colors Enables cutting of paths defined by spot color names other than 'CutPath'. See File -> Preferences to configure custom cut colors.
- Mode: Set the FlexCut mode. Accurate, Fast or Cutter controlled.
- Note: With FlexCut mode enabled, the last cutting color defined in the System Preferences will use the FlexCut option. If only one cutting color is designated in the file, that cut path will utilize FlexCut (even if the cutting color is named 'CutPath')
- Use front panel settings: This control will respect front panel settings for FlexCut controls for length, pressure, velocity, etc.
- Cutting Length: Set the length for Full Pressure cuts for FlexCut paths.
- Flex Length: Set the length for Flex Pressure cuts for FlexCut paths.
- Velocity: Set the speed for FlexCut paths in mm/sec.
- Full Pressure: Set the force for Full Pressure cuts for FlexCut paths
- Flex Pressure: Set the force for Flex Pressure cuts for FlexCut paths
- Cut off Media: Perform a sheet cut after processing cut paths. This control is intended for Roll media only.
Note: This control is only available for Summa S Class and Summa S Class 2 devices.
- Pause for Tool Change: Enables a prompt to change the cutting tool to be shown between cut paths.
Note: This control is disabled when using a wireless physical connection.
- Read Barcode Job Via Front Panel: When OPOS XY with Barcode has been selected for the Cutting Registration Marks, enabling this control will allow SoftRIP to launch a service that sends cut paths to the cutter from barcodes it scans. When "To PLT File" is the Physical Connection this option is disabled.
Note: When a single cutter is configured on more than one print unit, this control can only be enabled on a single print unit. Attempting to enable this control for a single cutter on multiple print units will produce an error.
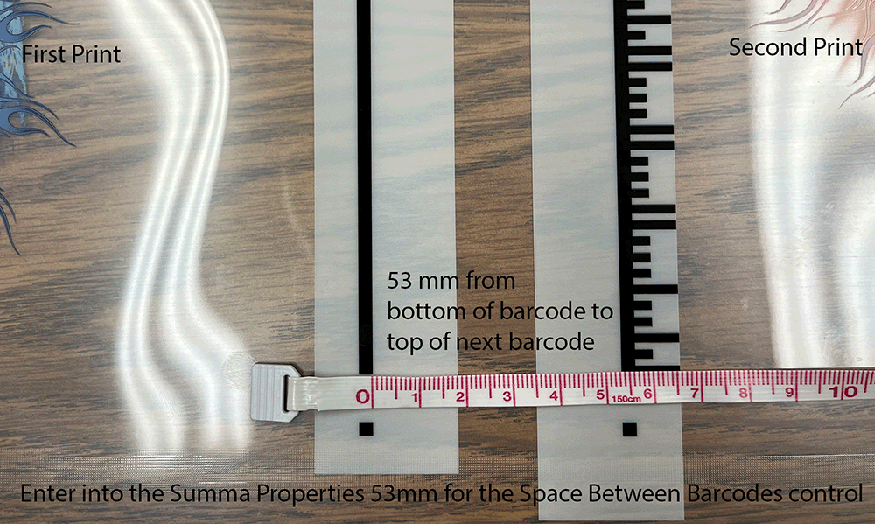
- Space Between Barcodes: When making prints to film that require white ink to be printed around the barcode register marks, and multiple print jobs will be cut from the same roll of printed media, it is important that when one cut job is complete, when the cutter goes to read the barcode of the next print that it does so from the white ink that surrounds the barcode. Otherwise a misread of the barcode an occur. See the example picture in the section on Loading DTF media for barcode workflows to see how to measure this distance.
- Output To File Cut Direction: When the Physical Connection is set 'To PLT File', this setting determines the embedded barcode number and orientation of cutting in the *.PLT file. If printing to a takeup reel that will be loaded on the cutter and read in the opposite order of printing, this setting should to set to, "Trailing Edge First".
- Destination Folder: When the Physical Connection is set 'To PLT File', this setting will determine where the file is written.
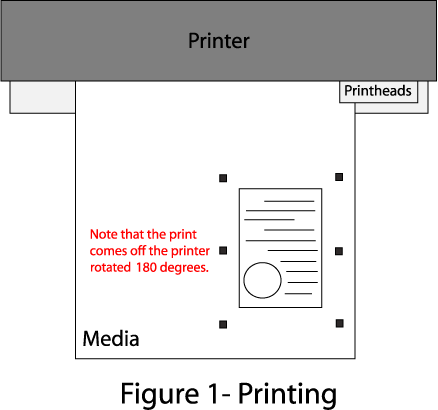
Note: When printing the image to be cut, note the way it comes off the printer. The image will be loaded in the cutter in the same direction (Generally upside-down)
Device-Specific Instructions for Print now, Cut later (RIP Detect Registration)
Note: The print should have been printed with "SummaSign Pro" Register marks. Select these marks from the "Cutting Mark" menu on the Print/Setup screen. In addition there are options to select between 'OPOS Marks' and 'OPOS XY' marks and to set the desired interval between the registration marks. See the 'Interval, OPOS XY Cut Marks, and OPOS Barcode Marks' discussion below.
Loading the media:
- As the print comes off the printer, note the edge that is to the lower right corner of the print. That corner will be referred to hereafter as the origin of the print (see Figure 1).
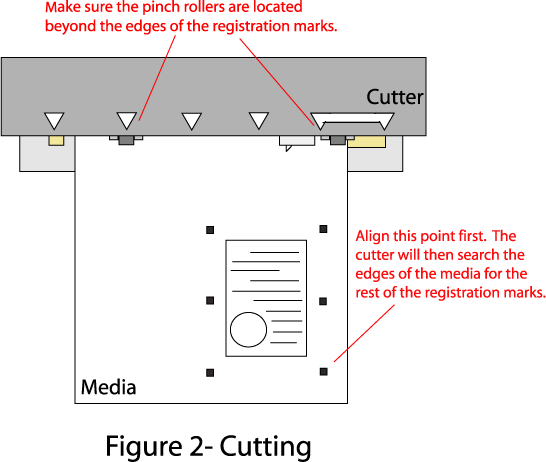
- Insert the media in the same direction as the media originally came out of the printer. Since the cutter cannot cut any media beyond the pinch rollers, align the media so that the pinch rollers are outside of the cutting area. (See Figure 2)
- Set the pinch rollers
- The cutter is now ready for the cut path to be sent from the Cutting Queue
- When the job is sent to the cutter, the cutter will ask you to set the first point
- See the user manual for further assistance.
Device-Specific Instructions for Print now, Cut later (OPOS Barcode Registration)
Note: Wasatch recommends that the Summa S Class cutter's internal firmware be upgraded and running firmware revision 036 for the S Class and 018 for the S Class 2 or later when attempting to use the barcode registration option. The current firmware revision installed on the cutter is listed on the front panel, under 'ROM Revision.' You can download firmware updates from Summa's website. Please refer to the Summa user manual and/or technical support for instructions on upgrading the firmware.
Note: The print should have been printed with "SummaSign Pro" Register marks. Select these marks from the "Cutting Mark" menu on the Print/Setup screen. Select the Summa 'OPOS Barcode' option to have the print(s) printed with both the barcode, as well as any registration and/or interval marks. The proper OPOS Alignment Mode must be set to 'OPOS Barcode' on the front panel of the Summa. Please refer to the Summa user manual on how to set the OPOS Alignment Mode.
Note: The Summa barcode registration method requires that the image(s) intended for cutting be at least 212mm in width. Also, the "Read Barcode Job Via Front Panel" option must be checked in the printer properties window in SoftRIP.
Loading the media:
- As the print comes off the printer, note the edge that is to the lower right corner of the print. That corner will be referred to hereafter as the origin of the print (see Figure 1).
- Insert the media in the same direction as the media originally came out of the printer. Since the cutter cannot cut any media beyond the pinch rollers, align the media so that the pinch rollers are outside of the cutting area. (See Figure 2)
- Set the pinch rollers
- On the front panel of the cutter, select 'Actions,' 'Load,' then 'OPOS Barcode.'
- Use the directional arrows on the front panel of the cutter to place the tool slightly in front of the barcode, and click 'Apply.'
- The cutter will then scan the barcode, and select the appropriate cut path from within SoftRIP. Once the proper cut path has been sent, the cutter will proceed to scan the registration/interval marks, then proceed to cut the job.
- Once the cut is complete, the Summa will automatically look for additional barcodes, and will cut the jobs accordingly, until no other barcodes are found.
Device-Specific Instructions for Cut Only
Loading the media:
- Insert the media in the cutter and align the media so that the pinch rollers are outside of the cutting area.
- After setting the pinch roller, the cutter will detect the paper
- Set the origin to the point you wish the cut job to begin
See the user manual for further assistance
- The cutter is now ready for the cut path to be sent from the queue
Loading DTF media for barcode workflows
When loading DTF media on the Summa cutter, ensure the image width is a minimum of 8.5".
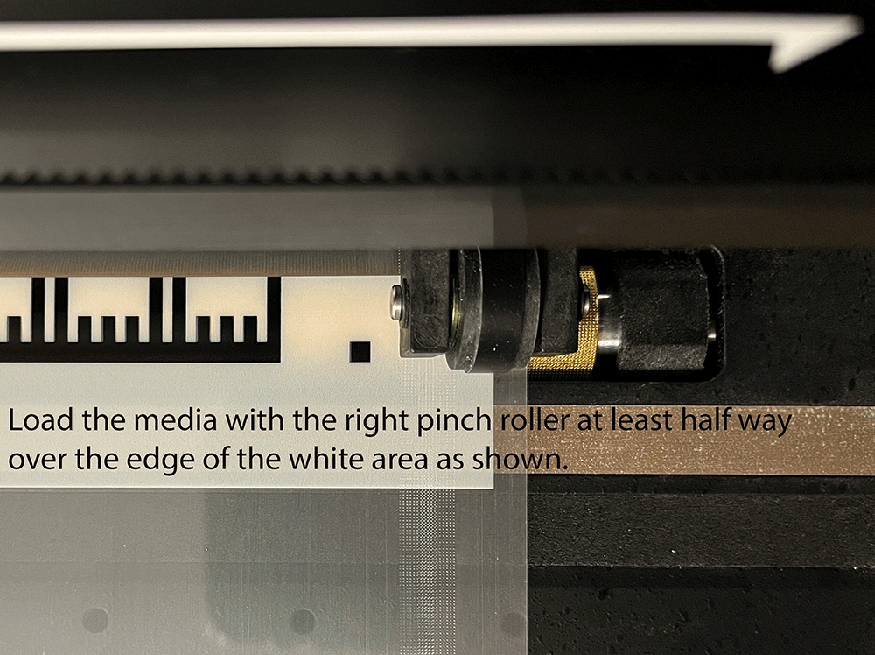
Place the right most pinch roller at least partially over the right edge of the white area. This will ensure correct placement when reading the barcode. The white area has been added because DTF media is not opaque and for the sensor to read the barcode, a contrasting background needs to be set. See below:
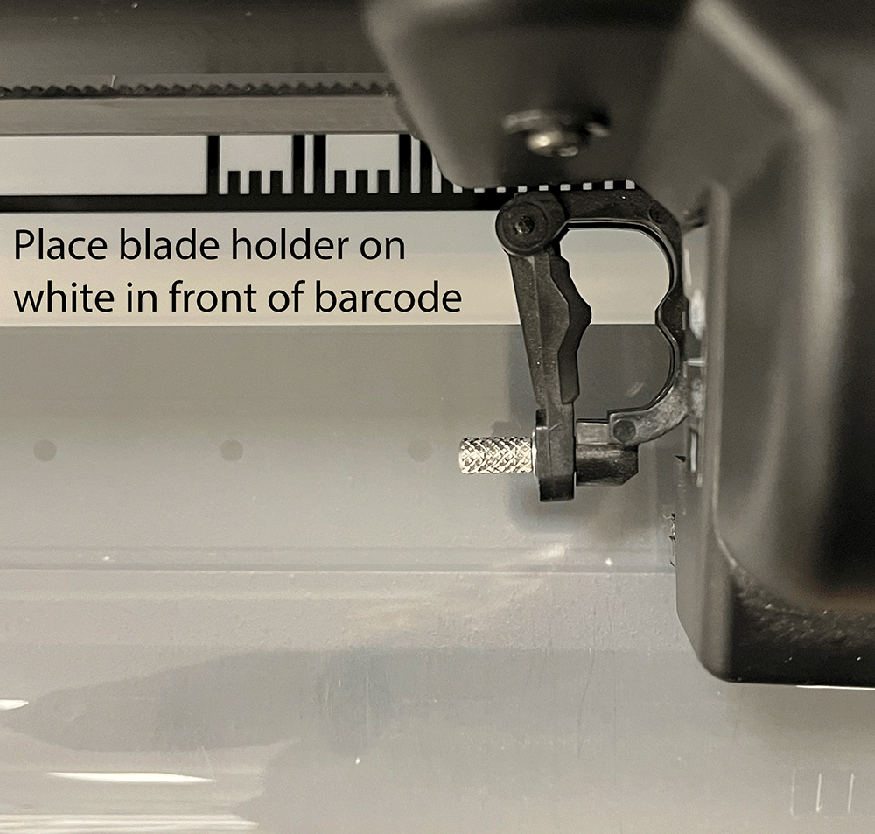
After the pinch roller lever is engaged and the media is detected by the cutter, then press the Action button followed by OPOS Barcode. Then use the arrow controls to move the blade holder on the white in front of the barcode, as shown below:
When multiple DTF print jobs are placed on a roll of media with the intention to have each cut out automatically in sequence, after one cut job is complete, it is important that the next barcode is read from the white area surrounding it. To accomplish this, the distance that print jobs are placed on the media by the printer needs to be measured and the value entered for "Space Between Barcodes" in the Summa properties.
The distance between the bottom of the barcode from one print job to the top of the barcode for the next print job needs to be measured in millimeters and entered into the control, "Space Between Barcodes". For more information see the Properties section above. Access the Suma properties by going to Printer Settings > "Edit" > "Properties".
Interval, OPOS XY, and OPOS Barcode Cut Marks
When you select 'SummaSign Pro' register marks from the 'Cutting Registration Marks' menu in Wasatch SoftRIP, registration marks will be printed at regular intervals down the edges of any print layout. (This feature only works with layouts and with the print spooler, never with immediate print of a single page.)
You will also be able to select between OPOS Marks, OPOS XY Marks, and OPOS Barcode Marks. Selecting 'OPOS XY Marks' prints an additional line between the cutting registration marks at the top and bottom of the cut job. This line allows the Summa cutter to compensate for 'bowing' of the media. OPOS Barcode Marks will print a specific barcode on the top and bottom of each job. This allows the OPOS sensor to scan and select the appropriate job from the Summa's cutting queue.
When you select 'SummaSign Pro' register marks, you'll be presented with the following control.
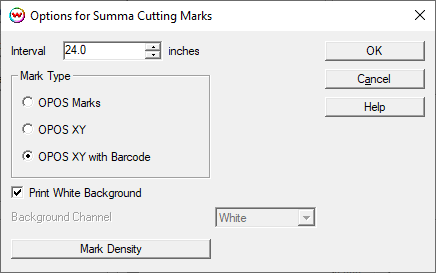
- Interval: If the length of the print is close to or greater than the maximum cutting mark interval, subdivisions of cutting mark spacing start there. This means that the interval should never exceed that maximum, and may be half of the maximum, as would happen if you had a 24 inch interval, as shown above, and were printing 24.1 inches.
- Print White Background: Enable if printing to DTF or similar clear film that requires additional contrast on print in order to read the barcode and register marks from the clear film.
- Background Channel: When printing to a HiFi device or one with more than a single unmanaged color channel, this control can be used to set the 'White' ink that will be printed around the black barcode and register marks.
- Mark Density: This can be used to set the printed density for the Black (top slider) and White inks that compose the register marks. It is recommended to start with the same values as set in the selected Imaging Configuration and adjust as needed to be read by the cutter. The imaging configuration values can be found by going to Printer Settings > "Edit" > "Color Transforms" > "Calibration". A warning will appear, click okay but do not change any of these values, note the ink reduction levels of the white and black channels then close this window.

 SummaSign Pro
 SummaSign Pro


