 Epson SureColor F2000
April 27, 2023
Special note for printing on dark substrates
Two new features have been added to SoftRIP to aid in printing on dark substrates: a Color Separation Rule and an Auto-Generation option.
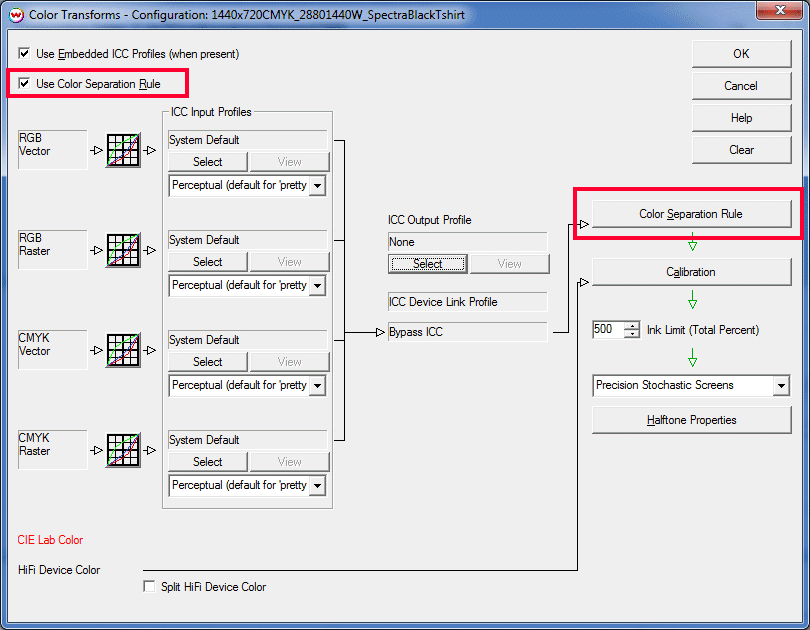
The color separation rule 'White Ink on Black Substrate' can be found in Print -> Setup -> Edit -> Color Transforms
-> Color Separation Rule. When this rule is selected, a virtual CMYK space is created from CMY, plus the white ink,
plus the black of the underlying surface. No black ink is used whatsoever in the print. Put simply, white ink is output
as the negative of the requested black ink. Because this exchange of black for white is done upstream of our 16-bit
final calibration stage, the process can be made smooth and easy to accurately color profile. A thorough description of the 'White Ink on Black Substrate'
color separation rule can be found below under 'Profiling white ink on black shirts'.
The Auto-Genaration option 'Create mask from traced areas' is recommended when printing a file with a backround that is not one
consistent color. A typical workflow would be to apply a spot color replacement to the background image set to Device, 0,0,0,0,0. When
working with an image that does not allow for a spot color replacement due to an inconsistent background fill, it is recommended to use
'Create mask from traced areas'. For a more detailed description of the two White ink on dark substrate workflows click here
Special note regarding Garment Creator
When spooling print data from Softrip, Garment Creator must not be running on the PC running Softrip. If Garment Creator is running the printer will trigger an error message related to ink layering. If you encounter this error message cancel the current print spooler and close Garment Creator. With Garment Creator closed you can now spool data.
Print Mode:
Pressing the Properties button next to the Printer Model window on the
Imaging Configurations screen will launch a control panel for this printer.
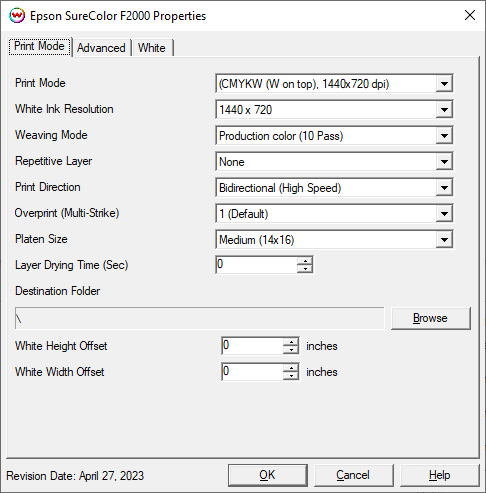
- Print Mode: Select the desired inkset and resolution for printing. The available inksets are listed below with a simple description.
- CMYK: This inkset should only be used for printers loaded with CMYKW. Prints will not use the White channel.
- CMYKW: This inkset should only be used for printers loaded with CMYKW. Prints will use all five channels.
- CMYKW (W on top): This inkset should only be used for printers loaded with CMYKW, when white is intended to go on top as the last color. Prints will use all five channels.
- High Speed CMYK: This inkset should only be used for printers loaded with CMYKCM. Prints will use CMYK plus extra C and M channels for speed.
- White Only: This inkset should only be used for printers loaded with CMYKW. Prints will use only the White channel. Three different resolutions are available. Source files will be converted to monochrome.
- White Only (Negative): This inkset should only be used for printers loaded with CMYKW. Prints will use only the White channel. Three different resolutions are available. Source files will be converted to monochrome and output will be inverted.
- MONO-CMYKW: This inkset should only be used for printers loaded with CMYKW. Prints will use only the channel selected on the Advanced tab. Source files will be converted to monochrome output.
- MONO-High Speed CMYK: This inkset should only be used for printers loaded with CMYKCM. Prints will use only the channel selected on the Advanced tab. Source files will be converted to monochrome output.
- White Ink Resolution: Select the resolution for the White ink printing.
- Weaving Mode: Select the Weaving mode and pass count, Quality, Production or Speed.
- Repetitive Layer: Printing with multiple layers is possible to increase ink density. When CMYK is selected the printer will print CMYK then retract the platen and print CMYK again. When White is selected the printer will print White, then retract the platen and print white again and retract the platen and print CMYK.
- Print Direction: Select Unidirectional or Bidirectional printing.
- Overprint (Multi-Strike): Select the Overprint value. This will increase the ink density. Setting the value to 2 will double the ink being printed and also double the amount of time printing.
- Platen Size: Select the platen size loaded on the printer.
- Layer Drying Time (Sec): Select a drying time after the white layer is printer and before the CMYK layer begins.
- Destination Folder: Select the folder files will be created in. To enable this feature you must select PRN File Unit X from the physical connection control in Print -> Setup. Note the X will show the unit number currently selected. Using this control a user can copy the .prn file to a thumbdrive and plug the thumbdrive directly into the Epson SureColor F-2000. This workflow can be useful when printing multiple copies of a particular job.
- White Height Offset: Enter the amount of vertical offset for the white, to align with the CMYK colors. Values range from -0.125 inches to 0.125 inches.
- White Width Offset: Enter the amount of horizontal offset for the white, to align with the CMYK colors. Values range from -0.125 inches to 0.125 inches.
White Auto-Generation:
- Information about the Auto-Generation options can be found HERE
Advanced:
The Advanced controls are located on the second tab. This tab is only active when a MONO mode is selected.
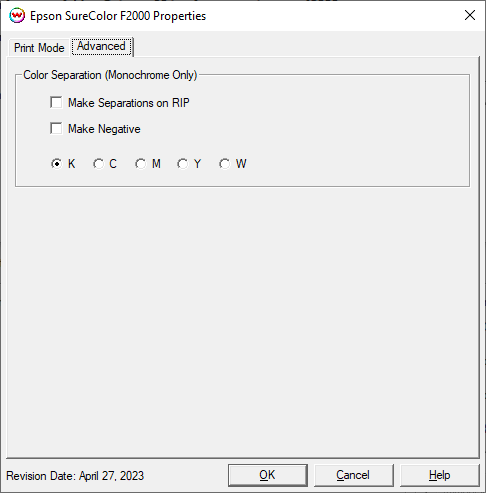
- Make Separations on RIP: This will cause the RIP to separate the image into CMYK plates.
- Make Negative: This inverts monochrome images when printed.
Workflow for printing white ink on dark substrates
As discussed above two new features have been added to SoftRIP related to printing on dark fabric. Illustration #1 shows an example using a spot color replacement to control how the background image data is printed. The spot color replacement is set to Device 0,0,0,0,0 which will not lay down any ink where the red 'candy striping' is shown. Without using the spot color replacement a rectangle of ink would be printed on the shirt. Often times this rectangle of ink is not desired when printing on T shirts.
Using a spot color replacement relies on the background color being a consistent fill. If your backgound color is not consistent, for example your background contains a gradients, you will need to use the 'Create mask from traced areas'. Illustration #2 shows an example using 'Create mask from traced areas' to achieve the same results as in Illustration #1. Once the 'Create mask from traced areas' control is enabled open your image file on the Job tab. Select the Trace tab on the left edge of SoftRIP's window. Right click and select 'Background Color'. Set the Tolerance and Choke/Spread controls and then click the Trace button.
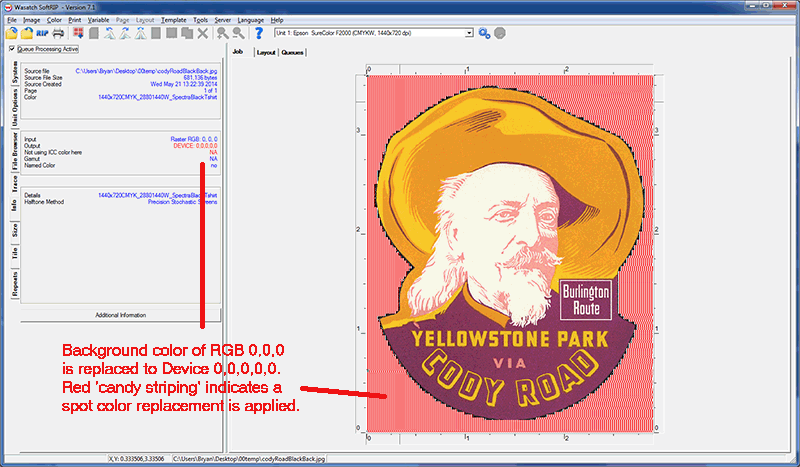
Illustration #1
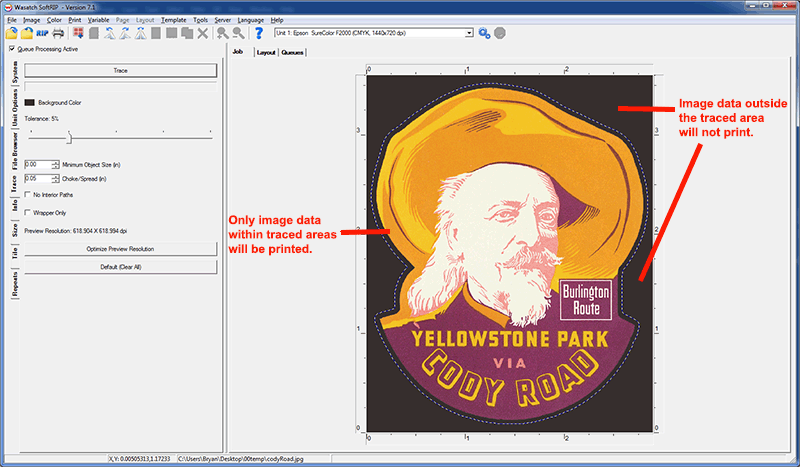
Illustration #2
Profiling white ink on black shirts
For printing white ink on black shirts find below instructions on creating a custom imaging configuration using the Color Separations Rule 'White ink on Black Substrate'. This Color Separation Rule does not print any black ink, instead using white ink as a negative of the black channel.
Before printing any target files you must enable the Color Separation Rule in the Print -> Setup -> Edit -> Color Transforms window. Click the control 'Use Color Separation Rule' then click the button Color Separation Rule. Both controls are highlighted in the following image.
After clicking the 'Color Separations Rule' button a new window will appear. Select from the drop down control 'White Ink on Black Substrate', shown in the image below.

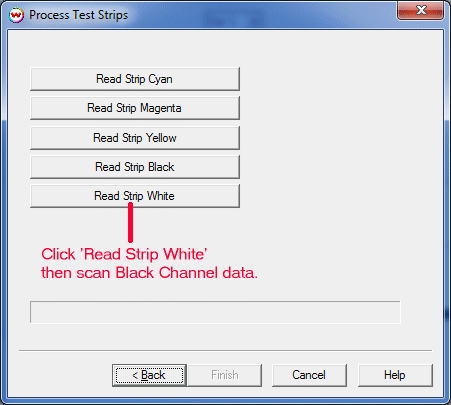
Proceed with the profiling process as outlined in our 'Profiling with SoftRIP'. When using 'White on Black Substrate' you must set the Auto-Generation tab in the Print -> Setup -> Edit -> Properties window to 'No Auto-Generation' or 'Create mask from traced areas'. Follow the normal procedure for profiling of Cyan, Magenta and Yellow. No data should be applied to the Black linearization curve. When scanning the Black portion of the linearization chart select the 'Read Strip White' button.
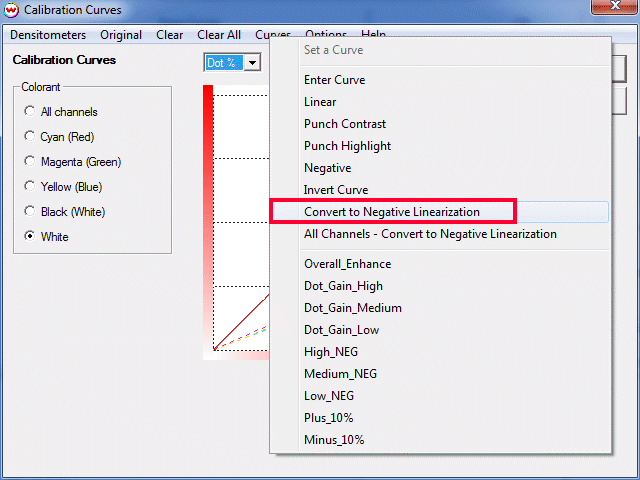
After the data has been scanned click the White channel under 'Colorant' and click the Curve drop down menu, then click 'Convert to Negative Linearization'.
[ Wasatch Home ]
 Epson SureColor F2000
  Epson SureColor F2000


