| |
 Mimaki TX2-1600 Mimaki TX2-1600
To ensure that data from Wasatch SoftRIP is correctly processed, you must set the PRIORITY setting on the front panel to HOST, never to PLOT. This revision of the Wasatch driver for the Mimaki TX2 supports variable-dot printing, and requires that the TX2 be equipped with Mimaki firmware revision 1.60 or later.
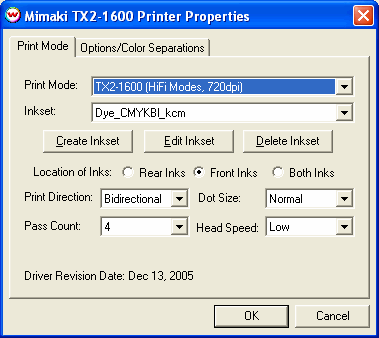
Pressing the Properties button for this device will launch the window shown below. On this window, you can select the print resolution, number of passes, and location of the inks in the printer.

- Print Mode: Selects the resolution and inks to be used.
- Inkset: Used only when a 'Hi-Fi modes' print mode is selected. Should be used if you are printing in any mode other than CMYK or CMYKLcLm. When a Hi-Fi Mode is selected you also have the options to Create, Edit, and Delete inksets. For more information see: Creating HiFi Ink Print Modes.
- Location of Inks: Selects which side of the printer the ink will come from. The inks closest to front panel of the printer are the 'Front Inks'. The inks installed on the opposite side of the printer are the 'Rear Inks'. Note: If you have the same inkset installed in both the Front and Rear heads, the printer will use both heads no matter what is choosen.
- Print Direction: Allows you to select Unidirectional or Bidirectional printing. Bidirectional is faster but may also decrease print quality.
- Dot Size: Choose between 4 different fixed dot sizes, or Variable to use variable dots. Printing with variable dots will result in smoother-looking prints, with the drawback that RIP times will be longer and the size of the variable-dot file on disk will be at least twice as big as that of a fixed-dot file. Changing the dot size will affect the ink density, so profiles created using a specific dot size will not work using a different dot size.
- Pass Count: Allows you to change the number of passes. The Pass Counts available will vary depending on the resolution selected. Lowering the Pass Count will speed up the print but will also reduce the quality.
- Head Speed: Controls the speed of the head itself. High speed is not an option when you are using the smallest Pass Count available or with some dot sizes under certain resolutions. While High speed will speed up your print it may also decrease the image quality.
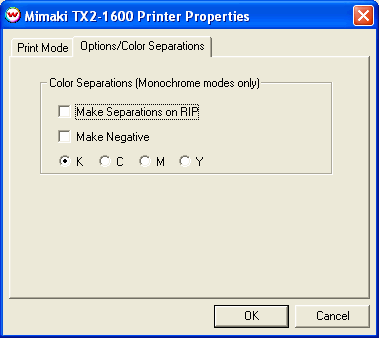
The color separations controls are located on the second tab. The separations controls are only available when using the monochrome modes of the printer.

Ink Installation table
| Head |
Acid dye ink |
Disperse dye ink
(for direct print and transfer) |
Disperse dye ink
(for transfer) |
| 1 |
Gray |
Gray |
Gray |
| 2 |
Black |
Black |
Black |
| 3 |
Cyan |
Cyan |
Blue |
| 4 |
Light Cyan |
Light Cyan |
Light Blue |
| 5 |
Magenta |
Magenta |
Magenta |
| 6 |
Light Magenta |
Light Magenta |
Light Magenta |
| 7 |
Yellow |
Yellow |
Yellow |
| 8 |
Blue |
Blue |
Cyan |
| A |
Gray |
Gray |
Gray |
| B |
Black |
Black |
Black |
| C |
Cyan |
Cyan |
Blue |
| D |
Light Cyan |
Light Cyan |
Light Blue |
| E |
Magenta |
Magenta |
Magenta |
| F |
Light Magenta |
Light Magenta |
Light Magenta |
| G |
Yellow |
Yellow |
Yellow |
| H |
Blue |
Blue |
Cyan |
IEEE-1394 is recommended to ensure an adequate data rate for this printer. Mimaki
distributes their own driver component for IEEE-1394, that must be installed in
Windows. This driver can also be found on the Wasatch SofRIP CD-ROM. Note that
Mimaki's driver is for Windows 2000 or XP only.
Steps on installing Mimaki Firewire
- Run the setup.exe from the Wasatch SoftRIP CD-ROM in the "\Misc\Mimaki IEEE1394", and follow
the prompts, and reboot when complete
- Plug the Mimaki printer into the firewire slot on the computer.
- You will be prompted for drivers for "Printer Port" and "Status Port". Choose the option of
"Install the software automatically". The drivers should be automatically located and installed
After installing the Mimaki IEEE1394 drivers, go to the Print Setup window in SoftRIP. From the Printer Model menu, select your Mimaki printer. After selecting the Printer Model, select IEEE1394-x in the Physical Connection list (where x is the order that the Mimaki Device was detected, see notes below on Connecting to Multiple Mimaki IEEE-1394 Devices).
The following IEEE-1394 FireWire PCI Adapter cards have been tested at Wasatch
and found to work well (every card we've tested thus far works fine):
- SIIG inc. 3-port 1394 (FireWire) DV kit Model: NN2628
- Western Digital 1394 Adapter WDAD002-RNW
- Bedienungsanleitung (German) 2external port 1 internal port IEEE 1394 FireWireAdapter ETC-6501
- D-Link FireWire Adapter Card DFW-500
- Macsense FireWire PCI Adapeter FW-100
- Orange Micro inc. OrangeLink FireWire 1394 PCI 70htl13943
Important Note on Connecting to Multiple Mimaki IEEE-1394 Devices: In order to print over IEEE-1394 to multiple Mimaki print devices simultaneously, the Mimaki IEEE-1394 driver v2.00 (or later) is required. To make use of this functionality, each Mimaki device must be connected to a separate IEEE-1394 (FireWire) PCI Adapter(up to a max of 4). Do not attempt to plug in multiple Mimaki devices into different ports on the same card, as hardware misdetection and other unexpected results may occur. Also, printing to multiple devices simultaneously may reduce communication speed somewhat due to the additional access time on your computers hard disc.
In addition please be aware of the following precautions provided by Mimaki:
- Do not connect to Printer or Printers through an IEEE-1394 Hub
- Do not network/connect PC to PC through IEEE-1394
- Do not connect another (non-Mimaki) IEEE-1394 device to computer.
- Do not use a IEEE-1394 cable with a length of over 4.5m (about 15ft).
- Do not remove/insert the IEEE-1394 cable when spooling data to the printer.
- Do not turn off the printer while installing the driver.
- Do not remove/insert the IEEE-1394 cable many times in rapid succession.
- Do not Shutdown, Restart, Send to Standby, or Hibernate while spooling data to the printer.
- Avoid connecting multiple printers to a Notebook PC, as the possibility of causing a 1394 communication error will become higher.
- If the PC is equipped with built-in IEEE-1394 ports on the main body/motherboard of the PC only one printer can be connected unless a separate IEEE-1394 PCI Adapter is added. Even in the event when the built-in IEEE-1394 ports are positioned dividedly in the front and back faces of the PC, more than one printer cannot be connected.
|
|
 Mimaki TX2-1600
