Creating Print Modes For Custom Inksets Creating Print Modes For Custom Inksets
Drivers for a select few printer models allow you to create a custom inkset to support sets of ink other than those normally supported by the manufacturer. When available, this tool allows you to enter colorimetric data such that Wasatch SoftRIP can effectively use custom inksets.
To create a new mode or "inkset" that uses inks other than monochrome or CMYK, it is recommended to have either a supported colorimeter so that you can scan the colorants yourself or have a way to obtain CIE XYZ color data from another source, such as the manufacturer of the ink.
IMPORTANT! To ensure that you create a valid inkset, please read the instructions carefully to avoid printing inks in the incorrect order!
Before you begin: Print out a test patch with all of the colors. This step is not necessary for CMYK or monochrome only inksets. Before you can begin creating a new inkset, you must first print out a test patch for all of the colors. Start with the 'none' Imaging Configuration. Select the inkset called "Starter Inkset--Inkset Creation Only", and the resolution at which you would like to print. To make this selection, click on the Properties button on the Imaging Configuration screen to launch the controls for the specific printer.Print out the file dtp32_Xcolor (where X is the number of slots in your printer). This is a unique file which prints directly to each head and permits an accurate measurement of the maximum density of each color. When you are ready to measure each patch, only measure the patches of each unique colorant (not including dilute versions of inks).
If you do not have a supported colorimeter:
If you do not have a supported colorimeter, you can measure the CIE XYZ (D65) color data using another colorimetry program. When obtaining these measurements, scan the patch with the maximum density for each unique color. (On dtp32_Xcolor.ps, this is the square number 0 of each color). Write these values down, as you will need to enter them in manually.
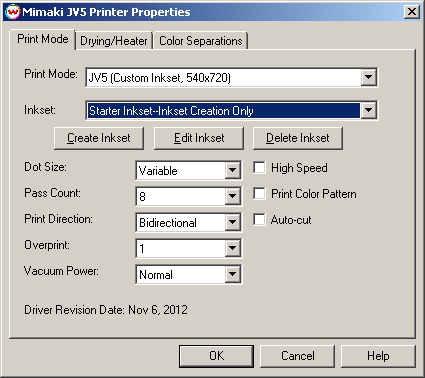
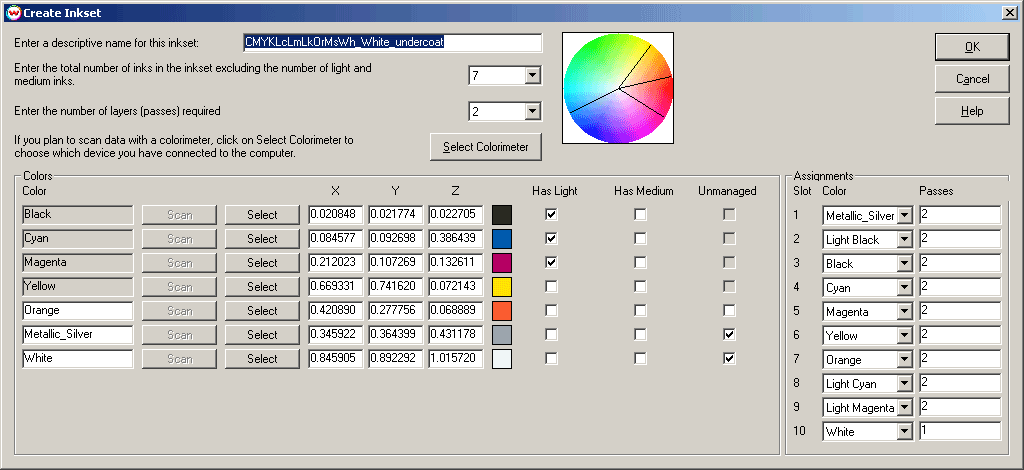
Click on the Properties button on the Imaging Configurations screen to launch the controls for the specific printer. Then, click on Create Inkset. The following window will appear:
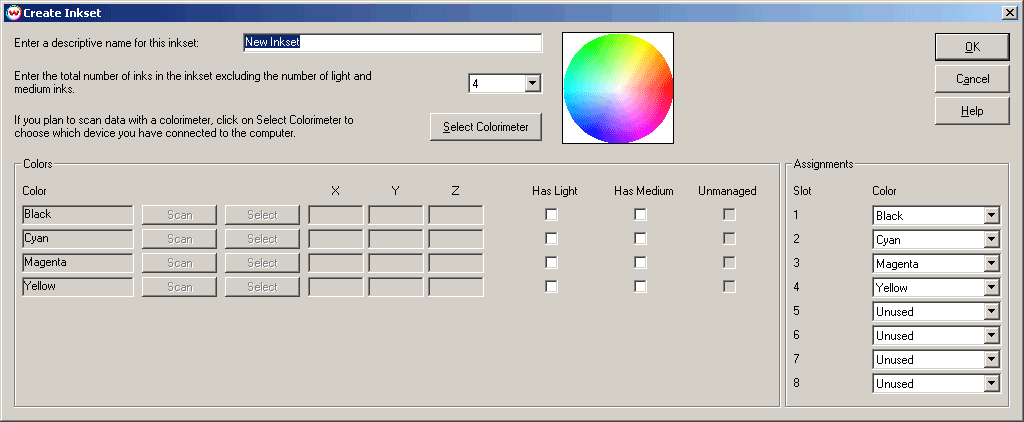
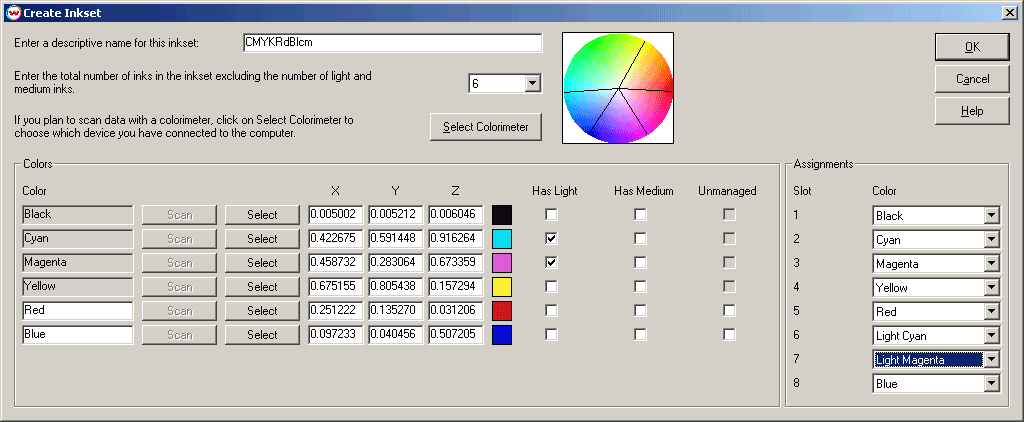
Step 1: Give the inkset a name, choose the number of colors, and set up your colorimeter:
a) Enter a descriptive name for the inkset.
b) Enter the number of unique colors in the inkset. (This is the total number of inks minus the number of light and medium inks.) Enter each color only once.
c) If you have a supported colorimeter, click on Select Colorimeter, and choose the device that you have. Choose the port where the device is attached and click OK. If the colorimeter is connected properly, the Scan button next to each color will no longer be grayed out.
Step 2: Enter the color data (if using an inkset other than CMYK or Monochrome):
Enter the name of each color (Note that the first four must be in the order black, cyan, magenta, and yellow). Click on Scan to automatically retrieve the color data from a colorimeter, enter the CIE XYZ color data values read from the printed test strip, or use the Select button to choose an approximation of the color. Select whether or not this color has a corresponding dilute ink (or optionally two separate dilutions), and whether this color is to be 'unmanaged'.
Unmanaged colors are useful for printing some non-color inks, such as white or varnish, or printing spot colors that you do not want to be used as a component to make up other colors (metallic gold and silver would be good examples). When a color is unmanaged, the color management is turned off for that color, and it is used only as a spot color as the user defines. To access this channel, you can print a multi-channel image which will specify data to be sent to unmanaged colors, or use the Spot Color Replacement tool to specify specific colors to be routed here. Some drivers may have additional "Auto-Generation" options for colors like white.
Step 3: Order the inks as they are installed in the printer:
Under Assignments, choose the correct ink for each ink slot in the printer. If a slot is unused, make sure that under the 'Color' column, it says 'Unused'. If an ink is used more than once, such as in the case of Dual CMYK, make sure that both slots show the color to be used.
When you are finished arranging the inks into their appropriate slots, click on OK. The inkset is now finished.
After you have created the inkset, you should linearize and profile the printer for the best color output.
Editing an existing inkset:
If you would like to edit an existing inkset, Click on Edit Inkset from the printer's property
page. Modify any of the inkset information as necessary, click on OK. You will be asked whether
you want to overwrite the existing inkset or save this inkset with a new name. If you click on 'No',
you will have to enter a new name for the inkset.
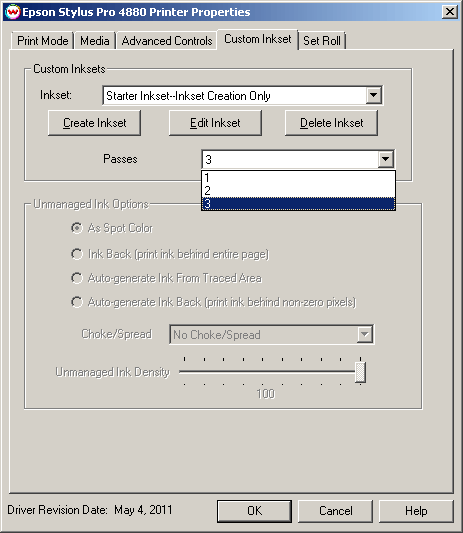
Additional Passes:
Some drivers have the ability to print in multiple passes, or layers. When using this feature Wasatch will send more than one print job to the printer, with each print job containing only specific colors.
(ie: printing only white in the 1st print job, printing CMYK in the second print job, and a varnish layer in the 3rd print job.) The number of available passes will depend on the driver.
When more than 1 pass have been selected, it is possible to select which colors will print
on which passes. For example, when 3 passes are selected, these are the possible values that can be entered for each color in an inkset: