Illustration 1: Launch Special Colors
Launch the Special Colors screen from the main Color menu (Illustration 1).
Illustration 1: Launch Special Colors
The following features are found on or accessed from the Special Colors window:
This menu also provides access to the Color Database and the Spot Color Capture feature.
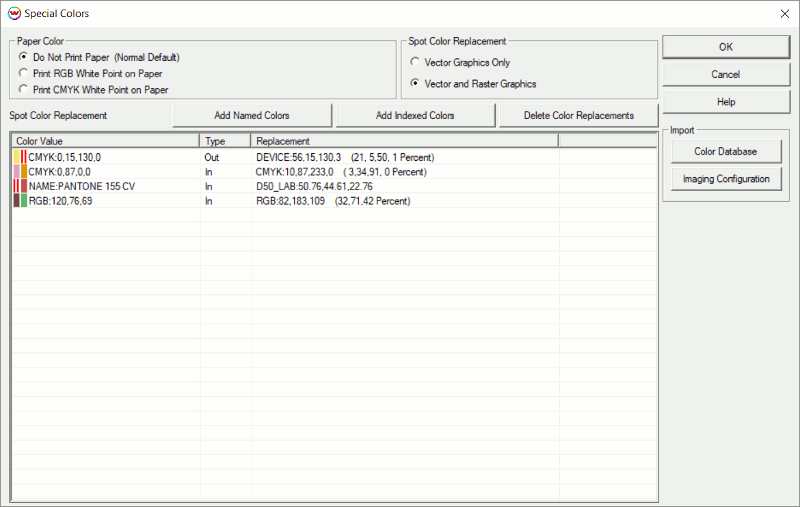
Illustration 2: Special Colors Menu
The Spot Color Replacement toolset provides precise controls for spot color printing. Spot colors can be tweaked to correct errors in incoming files, changed to reflect new requirements, and used to bypass color management altogether by directing output to individual print heads containing custom formulated ink.
In the Spot Color Replacement area of the Special Colors window (Illustration 2, above) select the type of images you wish to affect: Vector Graphics Only, or both Vector and Raster Graphics. Checking the Vector Graphics Only radio button ensures that spot colors (such as corporate logos) are individually color managed with no fear of corrupting embedded photographs (raster graphics).
Checking Vector and Raster Graphics allows you to manipulate the indexed TIFF files common in digital fabric and textile design.
There are two ways to select spot colors from an open preview image:
1) When an indexed, or limited-color image is previewed, use the Add Indexed Colors button on the Special Colors screen to read these colors into the window (Illustration 2). After a pause, you will be asked if you wish to add the colors to the list. This is a quick way to make entries to the Spot Color Replacement window.
The window on the Special Colors screen shows information in three columns. The Color Value column shows the original color and its color values. All colors are specified using the 0 – 255 range, whatever color space they are in. If no replacement color has been specified, the color square to the left is a solid block. If a replacement color has been specified, the color block is split. The left side shows the original color and right half shows the replacement color.
The Replacement column shows the values of the replacement color. If no replacement color has been specified, the values are the same as those in the left hand (Color Value) column.
In order to specify a replacement color, double-click on the original color in the left hand column. This launches the Spot Color Replacement screen (Illustration 3). The operation of this screen is explained in more detail below.
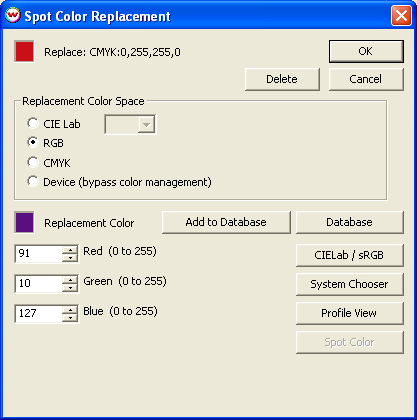
Illustration 3: Spot Color Replacement menu
2) The other method for making an entry to the spot color replacement list (on the Special Colors screen) is to right-click on any location in a previewed image, launching a pop-up menu (Illustration 4). The "color to be replaced" can be "CMYK", "RGB", or "Gray".
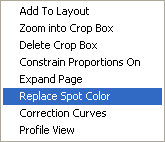
Illustration 4:
Select Spot Color Replacement
from the pop up menu
Selecting Replace Spot Color from the pop-up menu launches the Spot Color Replacement screen (Illustration 3), as well as the Special Colors screen if not already open. The Replace Spot Color menu may also be launched by double-clicking on any color in the Special Colors window, as previously noted. In Illustration 3, a red has been chosen, with the color shown as CMYK: 0,255,255,0 in the Replace area. Because this is the original, the formula will continue to be displayed unchanged.
Spot color replacements can be defined using "named" colors within the application software that drives Wasatch SoftRIP. This leads to some attractive workflow options. When right-clicking on a "named" spot color, Wasatch SoftRIP allows the definition of a replacement that will be applied to all colors bearing that name. For example, the name "White" can be assigned to a print head that contains white ink, and then the use of this print head can be directly specified by the graphic artist running the application software. The "tint", or "percentage" specifications made in the application software are applied to the replacement color, allowing such things as a "white gradient" to be produced by the artist. ("Tint" information only applies to CMYK and Device color, not to Lab or RGB color.)
Enter the values of the replacement color directly into the windows in the Replacement Color area. You may change the Replacement Color space to "RGB", "CMYK", "CIE Lab" or "Device" before you enter new values. In our example, the replacement color is a purple specified as RGB: 91,10,127.
Access the Database button in order to retrieve an existing color previously placed in a Color Database (more below). Name and save either the original or the replacement color using the Add to Database button.
Choosing "RGB" or "CIE Lab" as the replacement color space, causes a "CIELab / sRGB" button to appear on the Replacement Color screen (Illustration 3). This button launches the Color Mixing Window (Illustration 5).
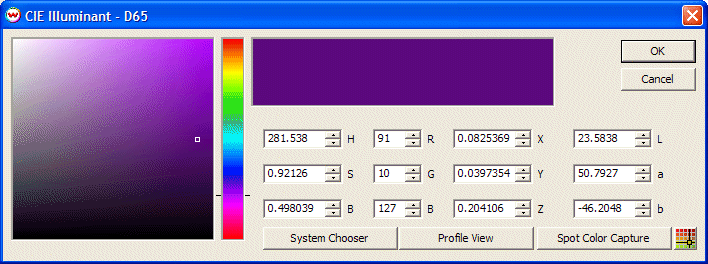
Illustration 5: Color Mixing Window
Colors chosen in this window may be specified in several different color spaces. After specifying a color, click OK to add it to the Replacement Color area of the Spot Color Replacement screen. From this window, you may also access Spot Color Capture, which allows you to record colors directly into the Color Database from any color sample or surface using a colorimeter. These colors may then be modified in the Spot Color Replacement screen. This feature is explained in detail here.
Selecting Device as the replacement color space changes the entry in the Type column of the Special Colors window from "In" to "Out". An "In" listing in this column means the color preview on the screen accurately displays the expected output color (Illustration 1).
Also, when Device is selected, the replacement color displays as a red hashmark in the selected image area (Illustration 7 below), in the Replacement Color area on the Spot Color Replacement screen (Illustration 6 below) and in the Color Value column in the Special Colors screen.

Illustration 6:
Using the Device replacement option bypasses all color management, enabling you to directly specify ink densities for individual print heads. Use this feature for metallic inks, varnishes, or specially mixed "corporate color" inks.
The example shown in Illustration 6 above involves a six-ink printer. Any spot color matching RGB:0,255,9 (a green) occurring in the image will be printed with whatever ink is loaded in print head number six. In the example show in Illustration 7 below, a spot color replacement has been specified for the areas labeled "PMS 875 Copper." Those areas will bypass color management and be printed with a custom ink. Affected areas are marked with the red hashmark.
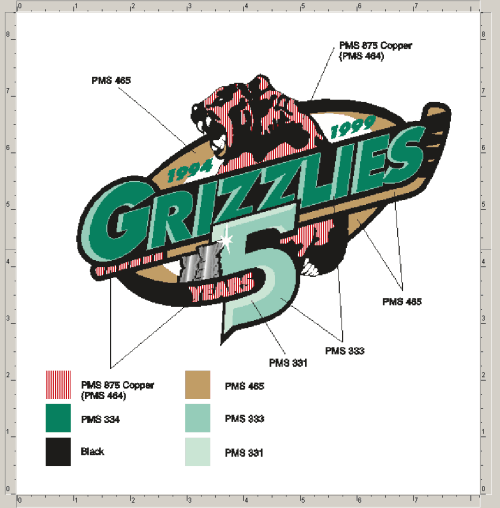
Illustration 7
When spot color replacement is active, moving the cursor over the affected area causes the Info display to show output color in red. In Illustration 8 below, a particular value of CMYK has been directed to the sixth print head of a six-ink printer.
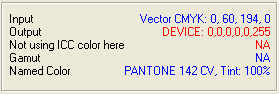
Illustration 8
The Paper Color area of the Special Colors screen allows you to simulate paper characteristics, and is useful for making the paper itself match a particular proofing "white point". This feature is used along with an Absolute Colorimetric rendering intent to produce color match proofs for "off white" papers. To produce match proof simulations of a CMYK device, select your ICC Imaging Configurations in the Color Transforms menu and check Print CMYK White Point on Paper.
The Color Database is a user-maintained list of named colors (Illustration 9). It is accessible two ways: directly from the Color menu at the top of the Main Screen, or via the buttons on the Spot Color Replacement screen.
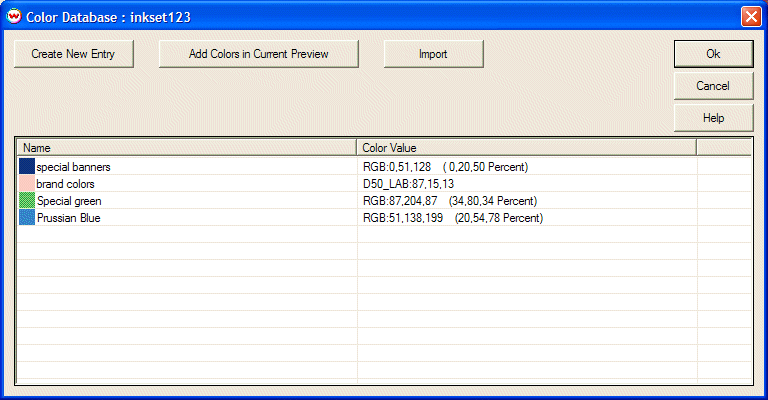
Illustration 9
Color entries in the Color Database can be edited or deleted by double-clicking on the color name. They can also be selected as replacements for spot colors specified in the Spot Color Replacement screen.
Colors may be entered into the Color Database several ways. Selecting Create A Database from the Color menu opens the Color Listings screen (Illustration 10). An existing database may be selected, or a new database may be created by clicking the Create A Database button.
The Import button can be used to import color databases from Excel "xls" and comma delimited files.
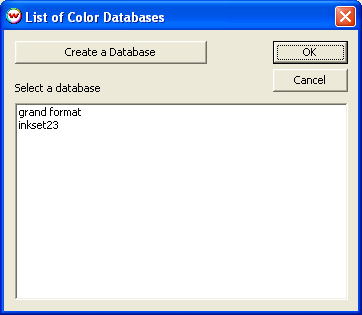
Illustration 10: List of Color Databases
When a new database name is entered, a new window launches (Illustration 11).

Illustration 11: New database entry window
Pressing the Create New Entry button launches the Color Mixer interface (Illustration 12).
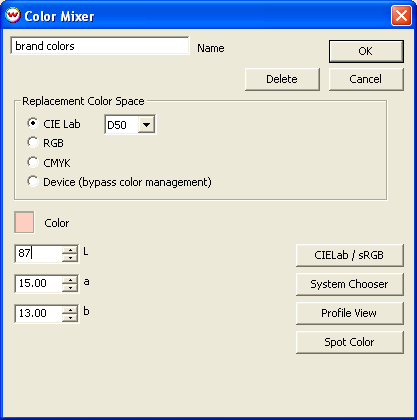
Illustration 12: Color Mixer
Color values may be entered in any of the windows on this screen. This screen also provides access to the Color Mixing window (Illustration 5). Color may also be selected by clicking and dragging on the "Saturation/Brightness" square or the "Hue Bar" next to it.
This unique feature lets you read any color sample with a colorimeter and record the color data into the SoftRIP Color Database. The color may then be used to replace any spot color in your jobs. This feature is described here.