Illustration 1: Adding images to a layout
The Layout tab lets you use the full width of your media as a digital canvas upon which you can prepare images to print as part of your complete production run. With this workflow, you can easily drag and drop images into the layout, manipulate them, and nest them to fit efficiently as part of your overall print run. Both new images and pre-RIPĺd images can be added to the layout tab for nesting into new production layouts. Pre-RIPĺd files will not be RIPĺd again when submitted for RIP processing as part of a new layout.
The key layout tools can be accessed through various methods to suit user preferences, including main menu options, right click menus, tool bar buttons, and hot keys.
To add an image to a layout, you can click the familiar "file open" button on the tool bar, or select Import File from the File menu (Illustration 1). You can drag and drop one or more files from the File Browser window on the left side directly into the layout or select a recently used file from the list shown at the bottom of the File menu.
Illustration 1: Adding images to a layout
When you add new files to the layout screen, the PostScript Interpreter will launch on your task bar to process the preview of the file. While this Interpreter is processing, you can cancel the import and preview of all jobs by clicking on the "Cancel Preview" button, located on the right side of the tool bar. Images can also be added to the Layout from other workflow tabs across the top of the main screen. To add an image from the Job tab to your layout, select the Add to Layout right click menu option or tool bar button.
To add images from the RIP and Print queues, select the job and click on the Add to Layout button. RIPĺd files will show up with a solid blue outline. RIP'd files cannot be resized/rotated/cropped etc unless you choose to re-RIP them. Note that only selected jobs can be added to layouts. Layout entries in the Print Queue cannot be added to other layouts.
From the Print Queue, you can also click the Layout Queued Jobs button to send all copies queued for print to the layout screen. Using this option with the Hold for Layout option creates workflow similar the to Manual Print Layout workflow from previous versions of SoftRIP. Note that the Layout Queued Jobs button is only activated when the selected Print Queue matches the printer selected in the Print Unit drop down window at the top of the main screen.
When working within the layout, move images by clicking on them and dragging them to the desired location on the layout. You can select multiple images by dragging a box around the group of images, or by holding down the Control key while clicking successive images.
There are two right click menus for working within the layout. Clicking on an image with the right mouse button will display a menu of options for changing the image size, rotation, mirror, position etc. Right clicking on the layout space between images will display a menu of options for creating automatic layouts, aligning or spacing multiple images, and other tools to assist in the creation of your layout.
At the top of the layout screen, there is a Name field for specifying a name for your layout. This name will be displayed in the notes field of the print queue when the current layout is submitted to the queues.
You can prepare images to print with tools like resize, crop, mirror, and tile easily with the layout workflow. You can access these tools by right clicking on an image, selecting an option from the Image menu, or using the appropriate tool bar button.
If you do not have a file selected, or have selected multiple images you will notice that some tool bar buttons and menu options become "grayed out"
Illustration 2: Modify images in a layout
Simple resizing can be done directly inside the layout screen by positioning your cursor over the imageĺs outline and dragging it in or out to achieve your desired output size. Select Quick Size from the Image right click menu to enter a scale percent or by entering the image width or height. Note that both of these size options will only resize with proportions constrained.
To crop or resize without proportions constrained, select the Size/Crop menu option or click on the tool bar Crop button to launch the Image from Layout tab. This screen occupies the space of the Job tab, and you will receive a warning message that any image previously opened in the Job tab will be closed.
The Rotate and Mirror tools can be used for one image or a group of images. Select your image(s) and select from the Rotate Right, Rotate Left, or Mirror menu options. Standard tool bar buttons are also available for these functions.
To define precise positioning for your image within the layout, select the Position menu option or double click on the image. A position entry box will launch for specifying the location of the imageĺs top left edge.
To tile an image that is too wide for your current printer, select the image and the Tile menu option. As with the Crop function above you will launch an Image From Layout tab; in this case with the Tile tab enabled on the left. You will be warned that any images open in the Job tab will be closed. After entering your tile configurations select the tiles to add to your layout and click the Update Layout button.
The Duplicate menu option will increase the copies of an image by one copy, whereas the Add Copies menu option will allow you to enter a specific number of copies to add. Note that identical instances of an image within a layout will only be ripped once. Duplicates that are then resized, rotated, or otherwise manipulated will need to be RIPĺd separately.
To remove a copy of an image from the layout, select the image and click the delete button on the toolbar or press the delete key on your keyboard. To clear an entire layout, select Clear Layout from the File menu, or click on the "close" tool bar button while the Layout tab is active.
SoftRIP provides you with a range of tools for creating easy automated or customized layouts. You can access layout design tools by right clicking on the open space between images on the layout. Note that the Job Labels option shown in this right click menu lets you show/hide the filename labels as shown in grey and red in the illustration above. The Show Grid option lets you show/hide the grid lines in your layout window.
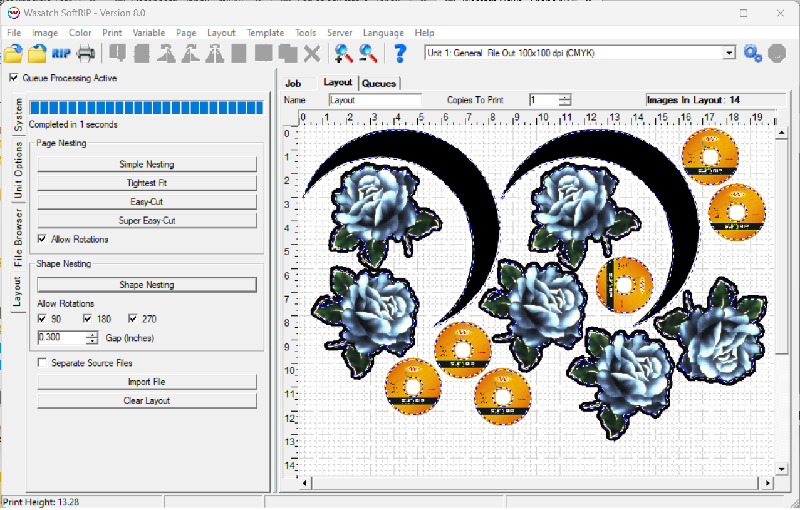
Illustration 3: Shape Nesting is one of the Nesting Options
Some tasks can only be performed on multiple images. If you do not have multiple files selected, you will notice that some menu options become "grayed out"
Whether you prepare your images directly in the layout window, or hold single jobs to arrange later, you can use SoftRIPĺs Smart Nesting to create efficient layouts. Smart Nesting offers several automated nesting options to balance your priorities for saving media and guillotine trimming time. The Allow Rotations setting saves even more media by rotating un-RIP'd files any time that rotation will make the overall layout more efficient.
SoftRIP provides additional tools to streamline the process of manually manipulating layouts to achieve individualized nesting objectives. For these tools, the primary selection (indicated by a solid green outline) will be the image that the other selected images (shown with dashed green outlines) are aligned or sized to. Note that some of these tools are only available when multiple images are selected.
Selecting RIP or RIP and Print from the Print Menu will submit the layout for processing. Learn about RIPing and Printing Layouts in the Print Controls section of online help.
When "Make Separations on RIP" is enabled, only pre-RIP'd jobs can be added to layouts. Open files in the Job tab and RIP them first. Then you can highlight the separated files in the Print Queue and select Add Job(s) to current layout to print them as part of a layout. Learn more about separations printing in the Color Separations section of online help.
Images from the VDP module can only be added to layouts after to RIPing if they were submitted to the RIP Queue with Create Preview Images checked. Images created without a preview can only be added to layouts from the Print Queue after they have been RIP'd.
Print jobs created with the Repeats option cannot be rotated/sized/scaled on the layout and must be modified before being added. If a pre-RIP'd Repeats job is added to the Layout tab, it will appear with a blue solid border indicating that it cannot be changed. Repeats jobs cannot be mixed with non-repeats generated jobs unless the output device is contone.