Illustration 1: Starting the Setup Window
Setup with SoftRIP is an easy, straightforward process. Begin by selecting one of the
four print unit numbers from the drop down Unit Window at the top of the main screen.
Setup is then an easy three step process:
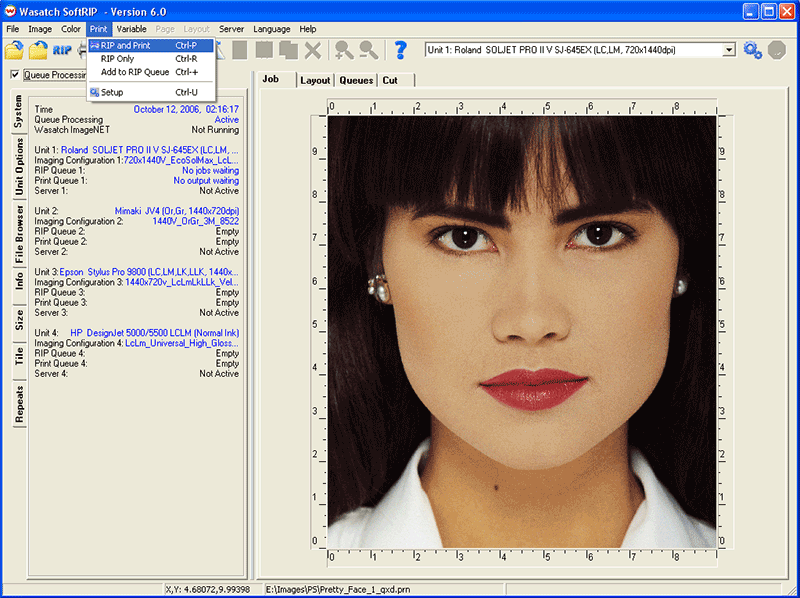
To make these selections, select go Setup from the Print menu or click on the "Gears" icon to launch the Setup screen (Illustration 1).

Illustration 1: Starting the Setup Window
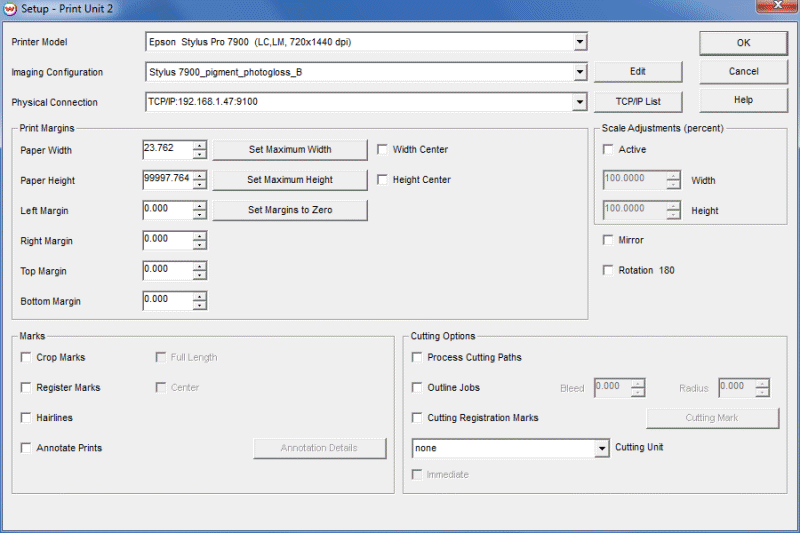
Select your printer from the Printer Model drop down window on the Set Up screen (Illustration 2). There are sometimes multiple listings for one printer model to reflect variations in inkset, print mode or resolution. Select the printer listing that matches your specific print scenario.

Illustration 2: The Setup Window
The SoftRIP Imaging Configuration includes all of the settings that will affect your final color output. Click in the Imaging Configuration drop down list to select the Imaging Configuration that matches your ink, media, and print settings. If you select an Imaging Configuration that is based on a different print mode than you have selected, SoftRIP will automatically update the Printer Model to be consistent with the Imaging Configuration.
Note that the drop down list will only display Imaging Configurations that have been installed to your hard drive. Insert the SoftRIP Imaging Configuration disk labeled for your printer manufacturer to install additional Imaging Configurations.
To learn more about the Imaging Configuration and printer controls that can be accessed from the Edit button on the Setup screen, visit the online help content about Imaging Configurations. If you have color configurations created for use with older versions of Wasatch SoftRIP, find out how to convert them to Imaging Configurations by reading about the Color Configuration Converter
NOTE: The Imaging Configurations distributed with SoftRIP have been generated by the Wasatch technical staff. Although these configurations are "generic", they should provide excellent results under most conditions. These Imaging Configurations are based on optimum printer settings for the print conditions described. SoftRIP also provides several levels of additional operator color control, described in detail in the color section of online help and at www.wasatch.com.
On the Setup window, select the Physical Connection you will use to connect to the printer. The default is the LPT1 printer port, but Ethernet (TCP/IP), USB, and Firewire connections are recommended for most current wide-format printers. The TCP/IP button is located to the right of the Physical Connection window. Read more about this topic in the Physical Connections content in the Printers section of online help.
The other options on the Setup menu (Paper Width, Print Origin, Crop Marks and Register Marks) are described in the discussion of print controls. These settings are not required for making an initial test print. The Setup screen also shows contour cutting controls. These settings are grayed out unless you have enabled the optional Contour Cutting module.
Once you have made your setup selections, click OK. The System tab on the main screen now shows your Printer Model selection in blue.
Before printing a "real" job, we suggest making at least one test print to ensure your system and connections are in working order. This process will also familiarize you with the basics of RIPing and printing a job. For a quick print test, try the color.ps file, located in the psfiles folder installed with SoftRIP on your hard drive. Otherwise, you may select any appropriate image file supported by SoftRIP.
To print your test file, select the Job tab at the top of the main screen and use the File menu to open your test file. A PostScript Interpreter will launch on your task bar to process the image preview. When the Interpreter completes, a preview of your file will display on the Job tab. Select RIP and Print from the Print menu (Illustration 3).

Illustration 3: Rip and Print Selection
A PostScript Interpreter will launch on your task bar during RIPing, followed by a Print Spooler. Clicking on either of these in the task bar will launch windows providing processing status information. As your job is processed, you will see changes on the System tab. As a job is being RIP'd in Unit 1, "Job Waiting" will briefly appear next to RIP Queue 1, followed by "Output Waiting" next to Print Queue 1.
|
Important Note!
You must always make sure that the Queue Processing Active at the top of the main screen is
checked. When this box is unchecked no new jobs will begin processing. This safety setting is
useful when you need to stop your production in a hurry, but can create problems if it is
unchecked by accident. When the box is unchecked, it will flash red and read "Queue Processing Not Active". Jobs are not RIP'd or Printed when the box is unchecked.
|
If you fail to see printing at this point, check all connections and make sure the correct Physical Connection is selected on the Setup screen.
If the color of the print is wrong, re-check the Imaging Configuration to ensure it matches your ink and paper.
To read about color theory and print basics, visit the Wasatch online learning library at to www.wasatch.com.